Hey everyone! Just dropping in real quick to let you know about this awesome deal I snagged yesterday. If you go to Plum District via my referral link, you can get $50 worth of products from Bloom.com for only $25. But on top of that, I think if you use my link, you get $5 off and if you use the code "fabulous" you get another $2.50 off. So, you could end up getting the $50 voucher, but only paying $17.50 for it!
There is only a little over one day left to snag this deal, so don't miss it if you want it! Bloom carries OPI, Zoya, and Essie polishes, as well as tons of beauty products from a bunch of different brands. I'm saving mine for the OPI Holland collection. :D Here is the link for the deal if you are interested: http://www.plumdistrict.com/t/9ec58d5bab/c
Friday, December 30, 2011
Scotch Naturals Review
Like many of you, I have recently discovered Katie at Harlow & Co. and her amazing online company. She stocks all types of brands that aren't readily available in the states and in Canada, like Glitter Gal, Models Own, and Ozotic. She also stocks Scotch Naturals polishes, which are really neat because they are water-based nail polishes. Katie was kind enough to send me a few Scotch Naturals polishes to review for you guys.
Since Scotch Naturals are water-based polishes, instead of solvent-based, they naturally require a different approach for application. I'm not going to lie, they are difficult to get used to. For starters, if you have any type of oil on your nail, the polish will not adhere at all; think of what happens if you pour water on an oily surface. It is also very important to let each coat of polish dry completely before you paint the next coat, or else you will drag the polish with the brush. It is also very important to let the polish set for a while, like a few hours, before you do anything with water (shower, dishes, etc.) or you could ruin your mani.
The first time I tried to apply Blood and Sand, I gave up. I wasn't entirely sure how to apply it properly and the formula was hard to work with. Eventually, I was able to get a full mani out of it and though it's not my best work, it's an improvement over what I originally had. I did three coats here with one coat of the Scotch Naturals combination base/top coat. The color is lovely; it's a nice shimmery light red shade.

Seaboard was a totally different story. This one applied so easily and I had no problems whatsoever with it. However, it looked perfectly opaque in person at two coats, but looking at it now, it appears that I should have done a third coat for photos. It's also a tad more blue-green than totally navy.

If you are looking for a healthy, eco-friendly alternative to regular nail polish and you have the patience to learn how to apply it properly, Scotch Naturals is for you. According to the information on Harlow & Co., they are 3-free and also free of ethyl acetate, butyl acetate, nitrocellulose, acetone, and heavy metals. The information card that came with the polishes also says that using this polish regularly will help your nails become healthier over time. Interestingly enough, I did notice that my nails seemed whiter (is that right? more white?) after I removed the Scotch Naturals polish. I can't explain that, but it was a pretty cool side effect. Scotch Naturals totally non-toxic polishes retail for $15 and are available for purchase on Harlow & Co.
Katie also sent me an awesome lip balm that I have to mention. It's Vegan Lip Balm from Spa Therapy Works in the English Toffee scent and I am OBSESSED with it. It's amazing! It gives your lips a little bit of shine like a gloss would, it's so moisturizing, and it smells fantastic. Definitely consider adding one to your next polish order! You can see the different scents and complete ingredient list HERE.
*The product(s) in this post were sent to me for review.*
Wednesday, December 28, 2011
Zoya Charla & Essie Shine of the Times
Confession: this is my first flakie polish. I know, I'm a little late to jump on that bandwagon, but this is the first one that has been easily accessible to me! It was definitely worth the wait though. Let's get right to the pics, shall we? The first photo is three coats of Zoya Charla with one coat of Essie Shine of the Times and one coat of Seche Vite. To compare it to mermaid scales would be an understatement.

I haven't matted anything in a while, so I decided to throw a matte topcoat on after a day or so. The result was amazing. I seriously need to start using my matte topcoat more often. Behold:


I haven't matted anything in a while, so I decided to throw a matte topcoat on after a day or so. The result was amazing. I seriously need to start using my matte topcoat more often. Behold:

Shine of the Times is part of the Essie Luxeffects collection out now. I've heard that they've been spotted in a few drugstores around the US, but I got mine from eBay for $6.70. Can't beat that! :) I have a couple more polishes that I'm itching to try out under Shine of the Times, so I'll try to get those up quickly!
Monday, December 26, 2011
Julep Alicia
I know we're just getting into winter... but I really had the urge to wear something bright and summery and Julep Alicia fits the bill! I love coral shades and though Alicia leans more pink than coral, I absolutely love it. Julep's polishes are so pigmented that it's hard for me not to love them, especially in tropical shades!

I used two coats of Alicia for what you see in the photos and it applied well after I added a few drops of thinner. I've found that most of the bright cremes from Julep arrive with a moderately thick formula, so adding some thinner from the start eliminates most application issues.

Saturday, December 24, 2011
Merry Christmas Eve!
I thought you guys might be interested in seeing what I'll actually be wearing on my nails for Christmas, so here it is! I'm planning on wearing a berry-colored sweater dress with leggings, so I decided to be outfit-matching-festive instead of all-out-red-and-green-festive.


I used three coats of Dr.'s Remedy PASSION Purple with Julep Trina sponged onto the tips. I stamped the snowflake with Orly Shine and added a clear rhinestone to the center. I'm very pleased with how it turned out. See you all on Monday! :)
Friday, December 23, 2011
Day 12: Hot Chocolate
Hello all! Welcome to the last day of my 12 Days of Christmas (and winter/holiday) Manis! I hope you have enjoyed everything I've come up with so far. I have to say, I think this might be one of my very favorite designs. It's adorable!

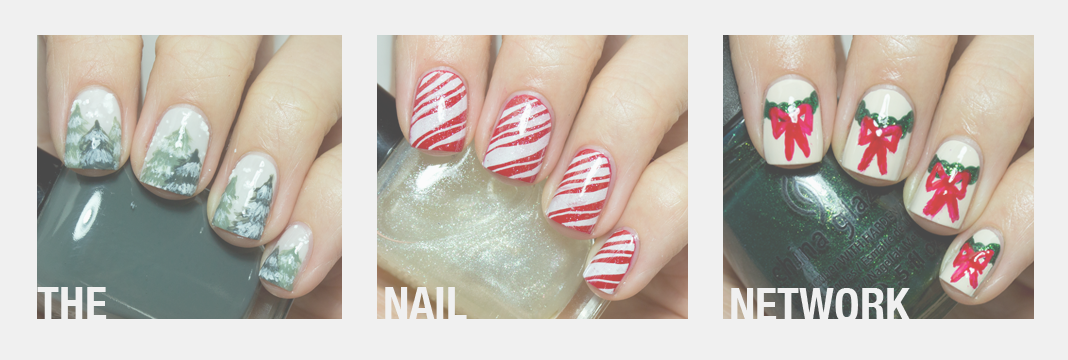
I started out with two coats of OPI Decades of Shades. Once that was dry, I stamped "steam" with OPI Espresso Your Style on all my nails. I created the mug with a silver Sally Hansen nail art pen and blobbed the whipped cream on with Konad special white polish; I used the Konad polish to draw the candy cane as well. To give the whipped cream a little more depth, I brushed some Sally Hansen Diamonds on top of it and finished the candy cane with Zoya Sooki stripes.

Thanks for sticking with me through this series and I hope you enjoyed it! I hope everyone has a safe and fantastic holiday! :D
Wednesday, December 21, 2011
Day 11: Candy Canes

Monday, December 19, 2011
Day 10: Green & Gold
Happy Monday everyone! Today is going to be a bit of a short post, but I have some better nail art on Wednesday and Friday to round off my holiday designs. For this mani, I used two coats of China Glaze Holly-Day, which I love! Holly-Day is a creamy evergreen that is actually just a smidge darker in person than in my photo. Two coats were all I needed for it to be even and perfect. I sponged some of Zoya Ivanka on my tips and added some big gold glitters from an unnamed polish by a brand called Black Poppy. I picked that one up at PacSun for super cheap! Hope you like!

Friday, December 16, 2011
Day 9: Snowy winter morning
Hola! I have a very special feature for today's post! Today I used one of the Girly Bits polishes that I got to review called January Morning. I will have a full review of all the Girly Bits polishes I was sent soon, but if you would like more info about the brand and how to order, you can click HERE. This is one coat of January Morning over two coats of Zoya Kristen.

Isn't it amazing? It's just like looking out the window after a fresh, twinkling snow with a beautiful blue sky. I have a feeling that January Morning would look awesome layered over any pastel shade. Here is a macro shot of three coats by itself:


Isn't it amazing? It's just like looking out the window after a fresh, twinkling snow with a beautiful blue sky. I have a feeling that January Morning would look awesome layered over any pastel shade. Here is a macro shot of three coats by itself:

How is everyone holding up with the holiday stress? Have you gotten all your shopping done? Are your cookies all baked? Are you sending some to me?? ;)
Wednesday, December 14, 2011
Julep Maven Box Review & Giveaway!
For those of you who don't know what the Julep Maven program is, let me fill you in. The Maven program is a monthly subscription program where you get between $40-$60 worth of products delivered to you every month for just $19.99. The boxes are different every month and always offer a new and exciting smattering of products for you to try. Julep's polishes are free of DBP, toluene, formaldehyde and formaldehyde resin and they also donate $1 from every nail polish purchase to organizations that help women. Add to that their perfect formula and awesome color range and what more could you really ask for?

The photo below shows the contents of my Introductory Box. I got Julep Nail Therapy, nail polishes in Kim, Trina, and Christina, a little pot of nail art sequins, and samples of their Hand Brightener cream and SPF 30 hand lotion.

Every box comes with a little card that has a description of what your box contains. "It Girl" was the style profile that I chose for my review, but there are many other style profiles to choose from. When you sign up for the Maven program, you need to take their Style Quiz to figure out which profile you would be. However, if you don't like what your box contains, you can always contact Julep and switch your profile. Their customer service has been top-notch in my experience.

Let's start off with Kim, shall we? Like my card says, Kim is a beautiful gunmetal gray shade with gorgeous shimmer. The formula was a little thinner than I'm used to with Julep and I had to use three coats to get what you see here. Two would have been okay, but three made Kim just a bit darker and more smokey.

Next up is the beautiful Christina. I can see myself wearing this on my toes all summer! Christina is a fiery orange-red with golden shimmer. Absolutely gorgeous and perfect in two coats. You can see a bit of VNL in the photo, but it wasn't noticeable in person.

Last but certainly not least is Trina, a deep purple shimmer. Trina is absolutely flawless. The formula was amazing and would have been perfect in one coat, but I did two here out of habit. Do yourself a favor and pick this one up before winter is over! :)

*EDIT*
The giveaway is now closed. I will hopefully decide the winner and announce tomorrow!
Julep was kind enough to send me one of their Introductory Boxes to review for you guys and they were even more kind to offer one to give away to my readers! There will be more on that at the end of the post! Since my box happened to come in December, I found that it was all decked out for the holidays! Everything was packaged very well and arrived safely to me.

The photo below shows the contents of my Introductory Box. I got Julep Nail Therapy, nail polishes in Kim, Trina, and Christina, a little pot of nail art sequins, and samples of their Hand Brightener cream and SPF 30 hand lotion.

Every box comes with a little card that has a description of what your box contains. "It Girl" was the style profile that I chose for my review, but there are many other style profiles to choose from. When you sign up for the Maven program, you need to take their Style Quiz to figure out which profile you would be. However, if you don't like what your box contains, you can always contact Julep and switch your profile. Their customer service has been top-notch in my experience.

Let's start off with Kim, shall we? Like my card says, Kim is a beautiful gunmetal gray shade with gorgeous shimmer. The formula was a little thinner than I'm used to with Julep and I had to use three coats to get what you see here. Two would have been okay, but three made Kim just a bit darker and more smokey.

Next up is the beautiful Christina. I can see myself wearing this on my toes all summer! Christina is a fiery orange-red with golden shimmer. Absolutely gorgeous and perfect in two coats. You can see a bit of VNL in the photo, but it wasn't noticeable in person.

Last but certainly not least is Trina, a deep purple shimmer. Trina is absolutely flawless. The formula was amazing and would have been perfect in one coat, but I did two here out of habit. Do yourself a favor and pick this one up before winter is over! :)

Now, to the part you patiently waited for: the giveaway! Julep will be giving away an Introductory Box to one of my lucky readers! Ready for the rules?
1. You must be a follower of The Nail Network. New followers are welcome!
2. You must be a resident of the United States or Canada.
3. You must be 18+ or have parental approval.
4. The giveaway will end on Wednesday, January 4th at 10PM EST.
*EDIT*
The giveaway is now closed. I will hopefully decide the winner and announce tomorrow!
Day 8: Gifts w/Zoya Noel
I hope I'm not throwing you off with this horizontally oriented photo. :P I wasn't happy that the silver gift stamp blends in with the blue glitter in all of my photos, so this was the best way I could position it for your viewing pleasure. It stands out more in person, I promise. Anyway, for this mani I started out with two coats of Zoya Noel, which is amazing by the way. As you can see, Noel is a medium blue/aquamarine-y foil with tiny, tiny bits of silver in it. Icy and awesome.

I sponged Milani Blue Flash on the tips and then sponged Sally Hansen Diamonds on top of that because it STILL wasn't sparkly enough. ;) Lasty, I stamped the gift with Orly Dazzle and topped it off with a light blue rhinestone. I wasn't really crazy about this one at first, but it has grown on me. I know I haven't given you guys a nice macro shot in a while, so here you go! Enjoy!

Tuesday, December 13, 2011
You guys!! The Hunger Games collection is back on!
China Glaze and Lionsgate figured their stuff out apparently and are still collaborating on a collection for The Hunger Games release in March, which is awesome news because I need these! It looks like they kept all the same colors and just changed the names around. According to The Hob, each shade now corresponds to one of the twelve Districts. Check it out:
 Luxe and Lush – District 1 (Luxury)
Stone Cold – District 2 (Masonry)
Riveting – District 3 (Technology)
Hook and Line – District 4 (Fishing)
Electrify – District 5 (Power)
Fast Track – District 6 (Transportation)
Mahogany Magic – District 7 (Lumber)
Dress Me Up – District 8 (Textiles)
Harvest Moon – District 9 (Grain)
Foie Gras – District 10 (Livestock)
Agro – District 11 (Agriculture)
Smoke and Ashes – District 12 (Mining)
Monday, December 12, 2011
Day 7: Glittering Garland & Holly Leaves
This is gorgeous! I can't believe it took me so long to wear China Glaze Glittering Garland. It seriously is the most sparkly, amazing green polish I've ever worn. It is part of the 2011 holiday collection from China Glaze called Let It Snow and you can probably still find it at Sally Beauty or online. Snatch it up!

I used two coats of Glittering Garland for what you see above. Make sure you let the coats dry sufficiently in between applying them or else the brush will drag and create bald spots. When that was all dry, I stamped holly leaves with Color Club Perfect Mol-ten and added red rhinestones for the berries. This is another really low-key holiday design that I loveeeee! Would you wear this?

I used two coats of Glittering Garland for what you see above. Make sure you let the coats dry sufficiently in between applying them or else the brush will drag and create bald spots. When that was all dry, I stamped holly leaves with Color Club Perfect Mol-ten and added red rhinestones for the berries. This is another really low-key holiday design that I loveeeee! Would you wear this?
Friday, December 9, 2011
Day 6: Ornaments
Happy Friday everyone! Today my design started out with the stunning Zoya Sooki. Sooki is the perfect bright and sexy pin-up girl red polish; it has a jelly finish, so I needed three coats to cover up my nail line. I stamped a tree-like image with Zoya Kym on all my nails and then added ornaments with Orly Luxe. It definitely wasn't sparkly enough, so I dabbed some Milani Gold Glitz on the ornaments with the brush from the bottle. I think this is definitely the most bold design I've come up with so far! What do you think?

Here is a swatch of Sooki alone; keep in mind that it's actually way more red than my photos show... It's one of those polishes that are so bright they freak my camera out :P

Thursday, December 8, 2011
Zoya Feel Collection
Good morning everyone! I have something really awesome and special for you today, Zoya's Feel collection! The Feel collection was created to be the perfect winter neutrals and they truly are. I'm so excited that I get to share these with you, so let's get started:
First up is Kristen, a beautiful sky-blue-gray shade. I don't have any colors like this and I absolutely love it. I actually wasn't sure if I would like Kristen or not since light blues usually make my skin look red, but I'm very happy to say that this is one of my favorites.

Carey is the one true gray out of the collection. It's very pretty, but not overly exciting. I don't have a lot of gray in my stash though, so I'm happy to add this one!

Up next is the beautiful Megan, a lavender-gray creme. I had a really hard time picking a favorite out of this collection, but Megan is definitely one of them. I am so crazy about all these tinted grays.

Here is another one of my favorites, Kendal. A very, very light purple-gray or maybe even pink-gray in certain lighting situations. I really love Kendal, too. There are so many awesome shades in this collection.


And lastly, we have Avery. If I had to pick a least favorite from the Feel collection, I think this would be it. I'm not really crazy about how it looks with my skin tone, but I'm sure there are a lot of people that this would look awesome on. It really looked like I was applying liquid foundation to my nails! :P

Honestly, I think Zoya nailed this collection. I'm really impressed at the variety that they were able to create while still having a collection of obvious neutrals. The only thing I have a slight complaint about was the formula since it was a little tricky to work with. It seemed a bit on the thick side and didn't level itself off as well as some other Zoya polishes that I have. I'm sure that this would be solved with a couple drops of polish thinner, but I thought it was worth mentioning. Also worth noting, I used three coats of polish for all of these swatches. Two probably would have been sufficient if I had done them a little thicker from the start, but I did a really thin first coat. Overall, I would definitely recommend the whole collection, but specifically Kristen and Megan and/or Kendal.
You can pick these up at http://www.zoya.com/ or (I think) at Ulta for $8. While you're at it, you should definitely go like Zoya on Facebook and follow them on Twitter; they are doing incredible flash promos/deals/giveaways throughout the holidays that you need to get in on!
*The product(s) in this post were sent to me for review.*
Wednesday, December 7, 2011
Day 5: Festive French
Like that alliteration? ;) Welcome to Day 5 of my holiday mani celebration! I hope you're all enjoying yourselves so far and not getting too stressed out over the impending holidays!
Today I did a french manicure with some festive holiday colors :) I started out with two coats of my favorite french base, Confetti Pink Paradise. I used hole reinforcers to paint China Glaze Jolly Holly for the tips, but here's where my plan changed: I originally wanted to stamp holly leaves with a light green foil, but it just didn't show up well enough over the light pink base. Instead, I grabbed my silver striper for some tinsel-y accents. I dotted Dr.'s Remedy REVIVE Ruby Red under the silver lines and called it a day. This is one of my favorite manis so far, what do you think?

Today I did a french manicure with some festive holiday colors :) I started out with two coats of my favorite french base, Confetti Pink Paradise. I used hole reinforcers to paint China Glaze Jolly Holly for the tips, but here's where my plan changed: I originally wanted to stamp holly leaves with a light green foil, but it just didn't show up well enough over the light pink base. Instead, I grabbed my silver striper for some tinsel-y accents. I dotted Dr.'s Remedy REVIVE Ruby Red under the silver lines and called it a day. This is one of my favorite manis so far, what do you think?

Monday, December 5, 2011
Day 4: Snowmen
Hey guys! Welcome to Day 4! Today's nail art was inspired by building snowmen on a bright winter day. I am an artist so I get to use cheesy inspiration like that, don't judge! ;P Anyway, this is two coats of the lovely Julep Amy.

As you can see, Amy is an awesome dusty but bright teal/blue with a really great formula. Julep really knows how to make a creme polish. I used a dotting tool to make the little snowman and Zoya Noel for the snowflake stamping.


As you can see, Amy is an awesome dusty but bright teal/blue with a really great formula. Julep really knows how to make a creme polish. I used a dotting tool to make the little snowman and Zoya Noel for the snowflake stamping.

Friday, December 2, 2011
Day 3: Dr.'s Remedy Jolly & Joy Collection
Hello readers! Today I have my review of the Dr.'s Remedy holiday collection, Jolly & Joy, for you. Fair warning, you should probably get your credit cards out now because you are definitely going to want these!
First we have ESSENTIAL Emerald. Not really the deep jewel-tone that I picture when I think of "emerald," but still very pretty. I'm not a huge fan of green, but this one is okay with me. I used three coats here.

Next up is PASSION Purple, a veryyyy lovely "boysenberry" purple with silver shimmer. I love this one. I used three coats here as well.

REVIVE Ruby Red is incredible!! You know how some bloggers talk about polishes that seem to glow from within? I never really understood what they meant until I put this baby on. REVIVE Ruby Red is the most perfect, shimmery red I've ever seen. Opaque in two coats and absolutely perfect for the holidays.

Now the glitters! I really was not able to do these justice. They are so sparkly and gorgeous in person and I had a really hard time capturing that on camera, but I promise that you will not be disappointed with either should you choose to purchase them. RESOLUTION Red Glitter is definitely more pink than my photo shows (my pinky nail is most accurate); it's like a Bermuda-pink-sand-beach shade of pink and so glittery! I was so amazed when I put these on and found out that they both are totally full-coverage in two coats!

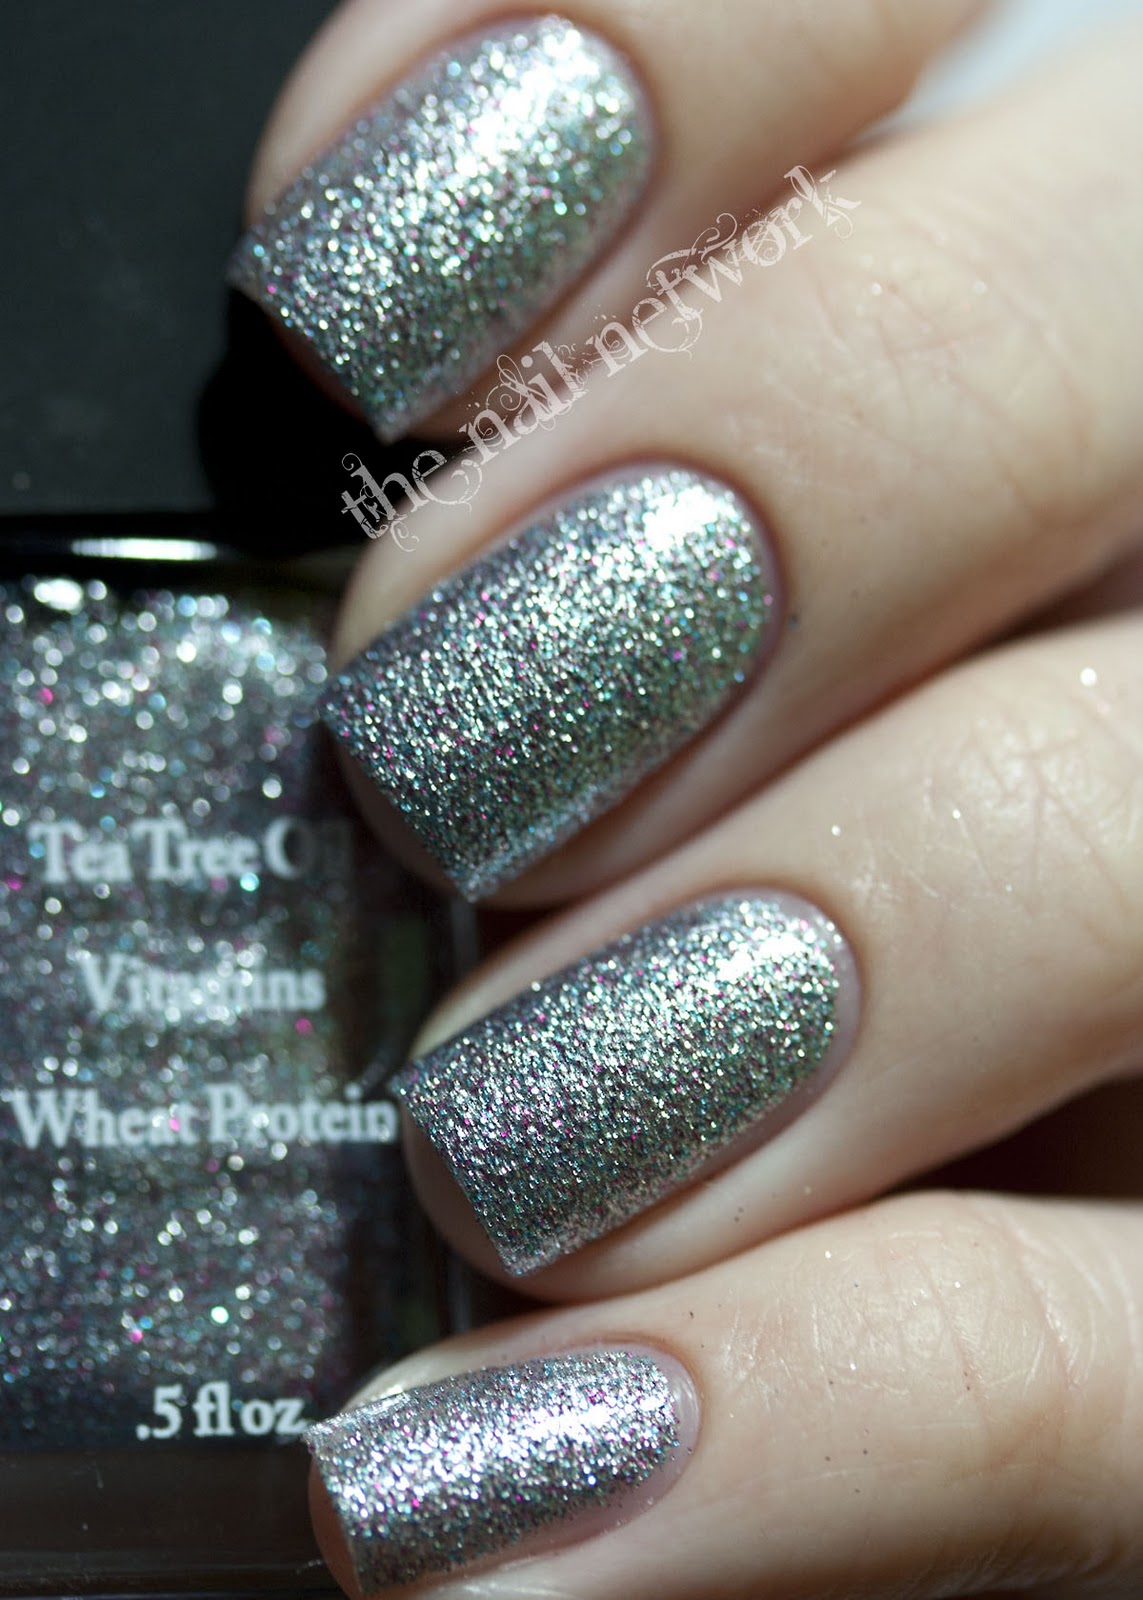
Again with this photo, the pinky nail is the most accurate for color. This is one awesome polish. SERENE Silver Glitter is not your typical silver glitter, it also has purple, blue, and a little bit of green glitter mixed in to make it really, really awesome. I can see these glitters making their way onto my nails for New Years Eve for sure.

First we have ESSENTIAL Emerald. Not really the deep jewel-tone that I picture when I think of "emerald," but still very pretty. I'm not a huge fan of green, but this one is okay with me. I used three coats here.

Next up is PASSION Purple, a veryyyy lovely "boysenberry" purple with silver shimmer. I love this one. I used three coats here as well.

REVIVE Ruby Red is incredible!! You know how some bloggers talk about polishes that seem to glow from within? I never really understood what they meant until I put this baby on. REVIVE Ruby Red is the most perfect, shimmery red I've ever seen. Opaque in two coats and absolutely perfect for the holidays.

Now the glitters! I really was not able to do these justice. They are so sparkly and gorgeous in person and I had a really hard time capturing that on camera, but I promise that you will not be disappointed with either should you choose to purchase them. RESOLUTION Red Glitter is definitely more pink than my photo shows (my pinky nail is most accurate); it's like a Bermuda-pink-sand-beach shade of pink and so glittery! I was so amazed when I put these on and found out that they both are totally full-coverage in two coats!

Again with this photo, the pinky nail is the most accurate for color. This is one awesome polish. SERENE Silver Glitter is not your typical silver glitter, it also has purple, blue, and a little bit of green glitter mixed in to make it really, really awesome. I can see these glitters making their way onto my nails for New Years Eve for sure.
Overall, I would give this collection two huge thumbs-up! I'm not bored by a single one of these shades and I truly think that Dr.'s Remedy managed to stay close enough to the "typical" holiday shades, while still creating a totally original and exciting collection. Definitely a win in my book!
Dr.'s REMEDY is a line of doctor-inspired cosmetics that is dedicated to using clean, hypo-allergenic ingredients. The birth-child of two New York-based podiatrists, Dr. Adam Cirlincione and Dr. William Spielfogel, Dr.'s REMEDY proves quintessentially-perfect for any person looking to better the condition of her skin and nails; their Enriched Nail Polish is the first-ever nail polish on the market approved by the American Podiatric Medical Association. Dr.'s REMEDY is sold online at www.remedynails.com or by calling 1-877-323-NAIL.
Head over and like them on FB here: https://www.facebook.com/Remedynails
And follow on Twitter here: http://twitter.com/#!/remedynails
*The product(s) in this post were sent to me for review.*
Head over and like them on FB here: https://www.facebook.com/Remedynails
And follow on Twitter here: http://twitter.com/#!/remedynails
*The product(s) in this post were sent to me for review.*
Wednesday, November 30, 2011
Day 2: Golden Snowflakes
I have for you today a pretty mani I did with Orly Luxe. This was two coats of Luxe, snowflakes stamped with Konad special white polish, and a coat of China Glaze Frosty over top. I felt like it still needed more sparkle after all of that, so I placed some rhinestones on the accent nail snowflakes.

I love this next picture... you can really see the shimmer from Frosty on my blurry middle finger nail. I love this design because it's festive but not over-the-top and in-your-face festive. This could also be done with a lot of different color schemes, too! :)

Monday, November 28, 2011
Day 1: Peppermint Bark
I hope everyone had a great Thanksgiving break, but now it's time for full-blown-holiday-season-ness! In honor of my love for this time of the year, I decided that I'm going to do a "12 Days of Christmas (and winter/general holiday) Manis" here on The Nail Network. Since I generally post on M/W/F, this will bring us right up to Christmas weekend.
The first mani I have for you is inspired by one of my favorite holiday season treats ever, peppermint bark chocolate! Ghirardelli is the best, but Dove is a close second and the packaging of the individual Dove chocolate is actually the inspiration behind this mani. See?

Anyway, on to the nails! I started out with two coats of China Glaze White on White and once that was dry, I added two coats of ChG Party Hearty. As you can see, Party Hearty is basically Christmas condensed into a tiny bottle of nail polish.

This is where my memory starts getting kind of fuzzy. I know I did at least two coats of ChG Frosty over Party Hearty, but I'm pretty sure I added another layer of PH and Frosty over all of that. I have to mention that I did have a little bit of trouble positioning the red hex glitter on my nails; it kept wanting to slide off towards the tips with the brush.

I love how you can still see all the glitter, but it's all shimmery and kind of hidden under Frosty. I am a huge fan of this. Even my boyfriend thought this was cool ;P

Saturday, November 26, 2011
Zoya Jana
Have I mentioned how in love I am with neutrals lately? You'll see why in a minute... this is Zoya Jana, which is an awesome shade of muddy light purple/taupe. I love this so much; it's so classy and sophisticated! I jazzed it up a little by adding a coat of Love My Nails Dazzling to my accent nails. As a Zoya, it's not surprising that the application was perfect and I used two coats of polish.


Friday, November 25, 2011
OPI Diva of Geneva
I bought this on a whim last weekend and OMGI'MSOGLAD. This first photo was taken outside when it was kind of overcast, so the shimmer in Diva of Geneva doesn't really show up like it does under strong lighting. However, this deep plum/magenta polish look gorgeous no matter what lighting you're in.

I used three coats of polish to get full coverage for these photos. The formula was good; each coat dried quickly and evened out nicely. Now, here's what you really want to see... This is Diva of Geneva under strong artificial lamplight...

*swoon* That gold-ish pink shimmer in there is ridiculous. I die.
Wednesday, November 23, 2011
Nails Inc. Magnetic Trafalgar Square
YESSSSS! One of my awesome friends works at Sephora and totally surprised me with this baby! Can you tell how excited I am? We used it right away and it's just as cool as I thought it was going to be and it's really easy to use. I now present to you Nails Inc. magnetic polish in Trafalgar Square.

I painted two coats of polish and let them dry completely. Then, nail by nail, I painted a third coat and held the magnet (in the cap) above my nail for 10-15 seconds. I know it's probably super obvious that I'm easy to amuse, but this is seriously so neat. You can actually watch the design appear under the magnet when you're holding it. Sephora also has a purple and a teal version of this, so get it on your wish list!


I painted two coats of polish and let them dry completely. Then, nail by nail, I painted a third coat and held the magnet (in the cap) above my nail for 10-15 seconds. I know it's probably super obvious that I'm easy to amuse, but this is seriously so neat. You can actually watch the design appear under the magnet when you're holding it. Sephora also has a purple and a teal version of this, so get it on your wish list!

Subscribe to:
Posts (Atom)