Hi guys!! I missed you all! I know it's been ages since I've posted and usually bloggers apologize for that when they've been absent, but I'm not going to this time. :P I've just been living life and pursuing other passions and I don't think there is a need to apologize for that. I started The Nail Network at a fun project, not as a job, so why should I force myself to post if I'm not feeling it 100%? I'd rather step away for a bit and come back once I've taken a breather and renewed my interest. With that said, I'm not promising I'll be back to posting consistently. I don't know when I'll post. I'm just going to paint my nails at my own pace and post when I feel like it.
But anyway, that's enough introspection and life-talk, I pulled these sunflower nails from my archives because I'm desperately craving the warm spring weather that we are supposed to be having in April! It's been snowing here the past two days! It's not sticking but still, it's the principle of the thing.
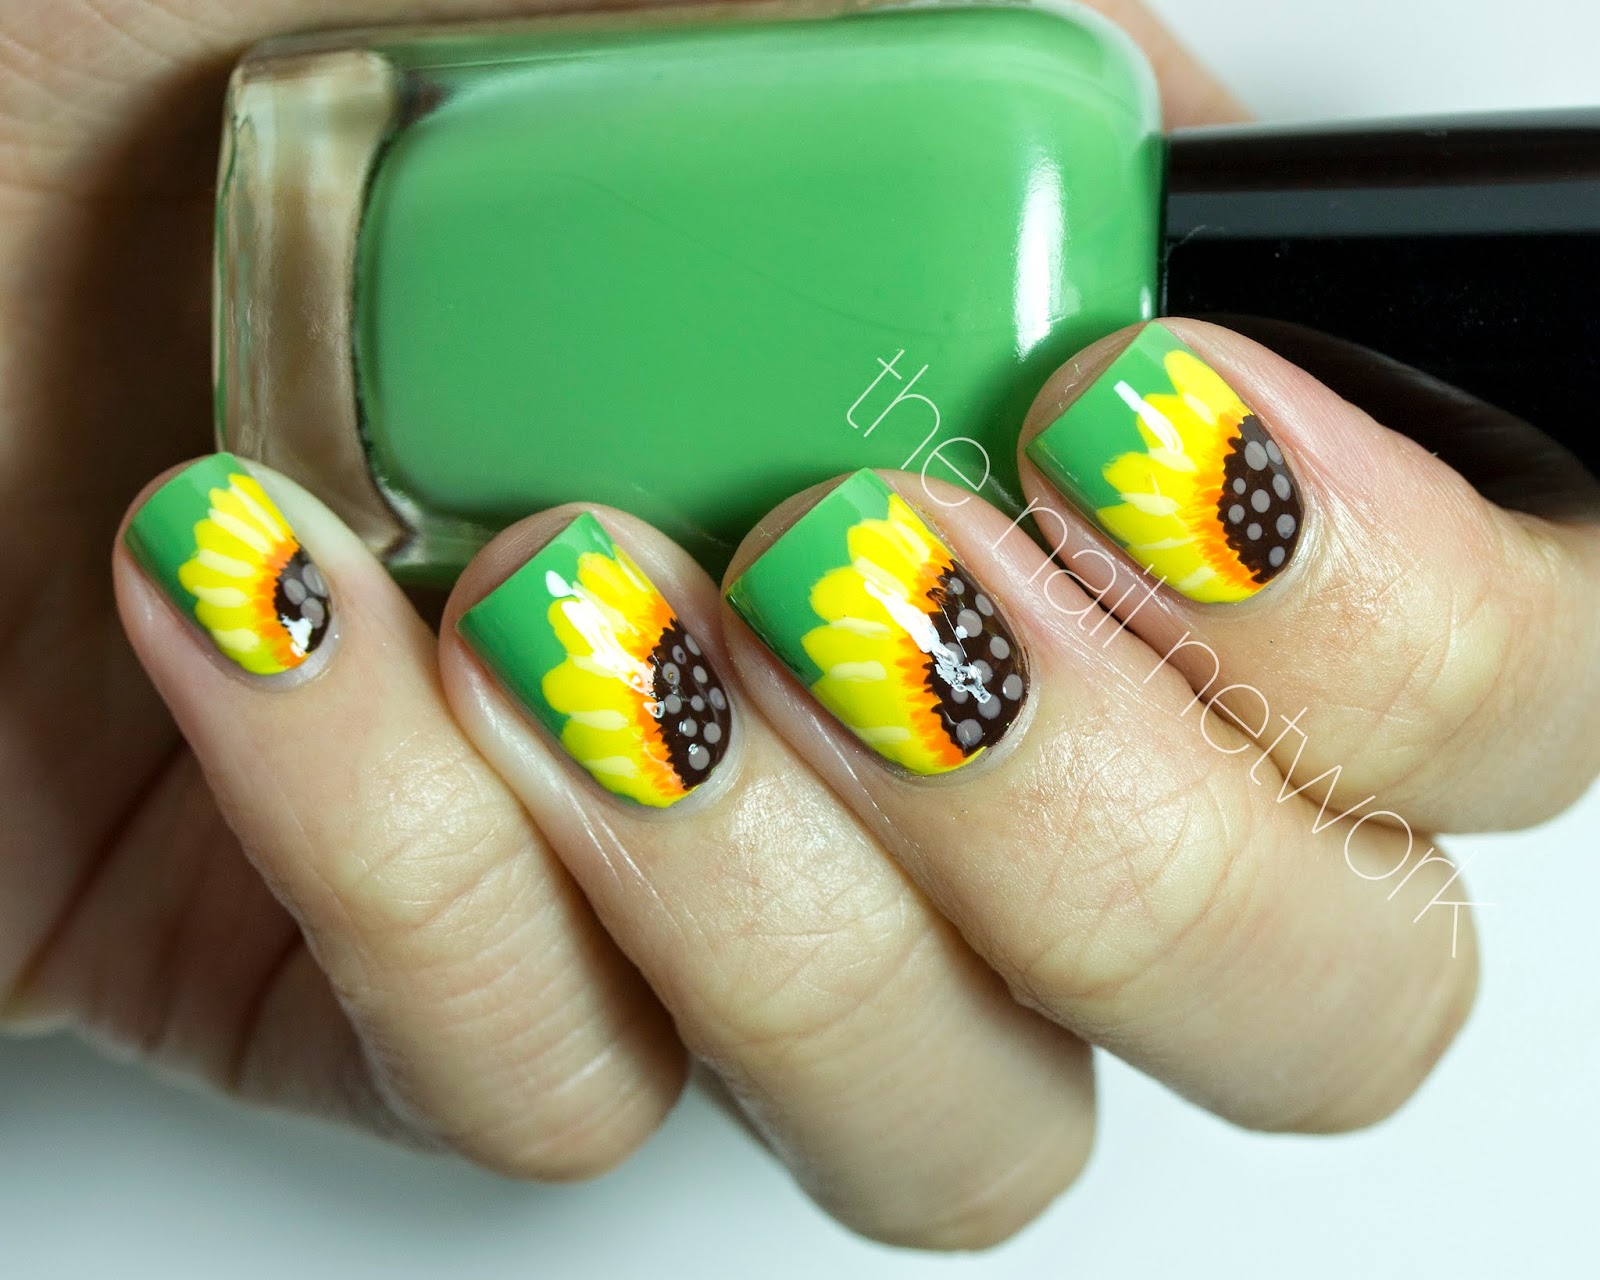
For this look, I started out with two coats of the most perfect green grass polish, Zoya Tilda. I used a nail art brush to paint the big yellow sunflower shape with a Sally Hansen Insta-Dry polish (the name is escaping me but I know it has the word "lightning" in it) and then I mixed a little bit of white with it to paint the lines for the petals. I used an orange shade (I don't remember this one either, don't kill me!!) to create a jagged line near the center of the flower and then I used Zoya Louise to make the darker brown area, making a jagged line over the orange. I finished the design off with some taupe dots inside the darker brown area. And top coat of course!
I have the whole weekend off, so hopefully there will be some nail painting and post writing in my near future! ;) Hugs!!
Showing posts with label nail art. Show all posts
Friday, April 24, 2015
Wednesday, December 10, 2014
TDOCNAS 2014: Day 5: Snowy Forest Nail Art
Good morning! I'm so happy with these nails and I'm dying to share them with you! Last week, I came across a repost of Nails By Jema's wintery forest nails on Instagram and I knew I had to try to recreate them.
I started with two coats of Rescue Beauty Lounge Bella for my base and then "watermarbled" with KBShimmer White Here, White Now (this technique was borrowed from MadamLuck). You just let a little drop of polish fall into the water and spread and stick your nail in and it creates a lovely snowy look! Once that was done, I used Zoya Evvie and SquareHue Na Prikope to create the pine trees and some plain white polish for the snow on the trees.
They're so pretty and wintery without being obnoxiously festive. But you could add some garland and ornaments to the trees if you were feeling obnoxiously festive! What do you think?
I started with two coats of Rescue Beauty Lounge Bella for my base and then "watermarbled" with KBShimmer White Here, White Now (this technique was borrowed from MadamLuck). You just let a little drop of polish fall into the water and spread and stick your nail in and it creates a lovely snowy look! Once that was done, I used Zoya Evvie and SquareHue Na Prikope to create the pine trees and some plain white polish for the snow on the trees.
They're so pretty and wintery without being obnoxiously festive. But you could add some garland and ornaments to the trees if you were feeling obnoxiously festive! What do you think?
Labels:
green,
nail art,
TDOCNAS,
Twelve Days of Christmas series,
white
Wednesday, December 3, 2014
TDOCNAS 2014: Day 2: Candy Cane Nail Art
I did candy cane nails two or three years ago and remember being so disappointed in how they turned out, so I decided to revisit them this year! I'm happy to say that I'm much more pleased with how these turned out! I decided to stamp them instead of trying to use tape and I'm way, way happier with them.
I used China Glaze With Love as my base color and stamped over it using a wavy stripe pattern from Bundle Monster plate BM-207 and Konad Special White polish. I topped everything with a coat of Zoya Sparkle Gloss and KBShimmer Clearly on Top and called it a day! I'm always surprised at how vividly the Konad white polish stamps over colors, but I guess that's what it was made for.
Are you all decorated for the holidays? We have our annual ugly sweater party coming up next weekend so I've been decorating for a while trying to get the house perfect!
I used China Glaze With Love as my base color and stamped over it using a wavy stripe pattern from Bundle Monster plate BM-207 and Konad Special White polish. I topped everything with a coat of Zoya Sparkle Gloss and KBShimmer Clearly on Top and called it a day! I'm always surprised at how vividly the Konad white polish stamps over colors, but I guess that's what it was made for.
Are you all decorated for the holidays? We have our annual ugly sweater party coming up next weekend so I've been decorating for a while trying to get the house perfect!
Monday, December 1, 2014
TDOCNAS 2014: Day 1: Half Moon Wreath Nail Art
I'm so excited that it's finally time for the Twelve Days of Christmas nail art series (TDOCNAS for short :P)! I'm not exaggerating when I tell you that I look forward to doing Christmas/holiday nail art all year long; this is my favorite time of year and I love having festive nails! The caveat is that each year it gets harder to come up with unique designs, but I have some pretty fun ones in store for you guys.
I started with a base of OPI My Vampire is Buff. Then, I used a dotting tool to create the wreath shape with China Glaze Glittering Garland and I also dotted some China Glaze Running in Circles over the darker green to give it a little more dimension. The hardest part of this design was creating the bows; I drew them first with white polish and then repainted them with red so that the red would stand out over the green. I'm not totally thrilled with them but they look adorable from regular viewing distance, so I'll call it a win!
Make sure to stop back on Wednesday for Day 2! :)
I started with a base of OPI My Vampire is Buff. Then, I used a dotting tool to create the wreath shape with China Glaze Glittering Garland and I also dotted some China Glaze Running in Circles over the darker green to give it a little more dimension. The hardest part of this design was creating the bows; I drew them first with white polish and then repainted them with red so that the red would stand out over the green. I'm not totally thrilled with them but they look adorable from regular viewing distance, so I'll call it a win!
Make sure to stop back on Wednesday for Day 2! :)
Thursday, November 27, 2014
Native American Dress Nail Art
Happy Thanksgiving everyone! I'm so looking forward to stuffing my face today, but I'm also looking forward to sharing this design with you! I think these turned out so cute and I hope you like them too. I was going to do a complimentary pilgrim look but didn't think it would turn out nearly as adorable as this. :P
I started out with a base of Essie Sand Tropez and then used a small nail art brush to create a ragged "V" shape from the tips of my nails with Milani Dark Coffee. Next, I took four different colors and painted the same type of ragged "V" shape inside of the brown one. Sorry, I don't remember exactly what four polishes I ended up using! To finish it off, I added some dots on top of the brown "V" and some fringe with white polish.
Do you do the cooking on Thanksgiving or just the eating? I'm in the latter category! ;)
I started out with a base of Essie Sand Tropez and then used a small nail art brush to create a ragged "V" shape from the tips of my nails with Milani Dark Coffee. Next, I took four different colors and painted the same type of ragged "V" shape inside of the brown one. Sorry, I don't remember exactly what four polishes I ended up using! To finish it off, I added some dots on top of the brown "V" and some fringe with white polish.
Do you do the cooking on Thanksgiving or just the eating? I'm in the latter category! ;)
Wednesday, November 26, 2014
Dotted Thanksgiving/Autumn Nail Art
I know, I know, it's not Thanksgiving yet, but this is what I will actually be wearing on my nails for tomorrow. I do have something adorable ready for tomorrow's post, but they aren't what I actually went with for my Thanksgiving nail art so I wanted to post these today. I've been loving dotted designs lately, so I figured I would try one with some autumnal colors!
I started out with a base of my favorite neutral, OPI My Vampire is Buff. I used a medium sized dotting tool to create half moon shapes with China Glaze Harvest Moon and then another half moon shape inside of the first ones with SquareHue Crown Street. To finish the design, I dotted Zoya Ziv with a tiny dotting tool inside the larger dotted arches and applied my top coat.
I love dotted nail art because it looks so intricate but is so simple to create! What are you wearing on your nails for Thanksgiving?
I started out with a base of my favorite neutral, OPI My Vampire is Buff. I used a medium sized dotting tool to create half moon shapes with China Glaze Harvest Moon and then another half moon shape inside of the first ones with SquareHue Crown Street. To finish the design, I dotted Zoya Ziv with a tiny dotting tool inside the larger dotted arches and applied my top coat.
I love dotted nail art because it looks so intricate but is so simple to create! What are you wearing on your nails for Thanksgiving?
Friday, November 21, 2014
Autumn Argyle Nail Art
Hi guys! I feel like I haven't given you nearly enough nail art recently, so let me make amends by sharing some fall nail art with you. This look is fairly easy to create and will definitely get you some compliments on your nail art skills!
I started out with a base of Essie Very Structured and when it was completely dry, I taped off a triangular area near my cuticles and painted it with SquareHue Champagne Toast. Once again, I allowed that to dry completely before I taped off an opposite triangle shape and painted it with Milani Chocolate Sprinkles. To finish the look, I used a thin striping brush to create the argyle pattern by painting a diamond shape on each nail in Milani Dark Coffee.
I know there's a lot of mixed feelings on argyle, do you love it or hate it? Would you wear this as your Thanksgiving mani?
I started out with a base of Essie Very Structured and when it was completely dry, I taped off a triangular area near my cuticles and painted it with SquareHue Champagne Toast. Once again, I allowed that to dry completely before I taped off an opposite triangle shape and painted it with Milani Chocolate Sprinkles. To finish the look, I used a thin striping brush to create the argyle pattern by painting a diamond shape on each nail in Milani Dark Coffee.
I know there's a lot of mixed feelings on argyle, do you love it or hate it? Would you wear this as your Thanksgiving mani?
Monday, November 3, 2014
Game of Thrones Targaryen Dragons Nail Art
Okay, so I know I said I didn't have time for nail art because I was too busy catching up on swatches, but I got this idea in my head last week and absolutely had to sit down and do it right away before I lost the inspiration. If you didn't know, I'm a huge Game of Thrones fan (books and TV show) and I couldn't resist doing some nail art based on Daenerys's dragons.
Viserion is a cream-colored dragon with golden horns and accents. For this design, I started out with a base of OPI My Vampire's Buff and sponged OPI Going My Way or Norway randomly over the base. I used Zoya Ziv and Bundle Monster plate 215 to stamp the dragon scale image over the base and top it with a coat of KBShimmer Clearly on Top. I wanted to see what the designs looked like matte as well, so the second photo shows a coat of Essie Matte About You over the design.
Drogon is a black dragon with blood red horns; his egg had swirls of scarlet on the black scales. I started out here with a base of A England Dorian Grey and sponged OPI German-icure over it. I used just a regular black polish to stamp the scale pattern over the base. I definitely prefer this one shiny, but I like the appearance of texture that the matte look has.
Rhaegal is the third and last dragon; his coloring is green and bronze. I started off with Zoya Hunter as my base here and sponged Zoya Edyta. I originally stamped the dragon scales with China Glaze Jolly Holly, but you could barely see them, so I stamped again with China Glaze Argo and I'm happier with the result. I think I like these better matte.
Please tell me that I'm not the only one who is going through Game of Thrones withdrawal!? I finished all the books so far and we are all caught up on the series so I guess my only options are to rewatch and reread until April (??) when the show comes back. But let's talk in the meantime... Who is your favorite character? Any word on when the next book will be out?
Viserion is a cream-colored dragon with golden horns and accents. For this design, I started out with a base of OPI My Vampire's Buff and sponged OPI Going My Way or Norway randomly over the base. I used Zoya Ziv and Bundle Monster plate 215 to stamp the dragon scale image over the base and top it with a coat of KBShimmer Clearly on Top. I wanted to see what the designs looked like matte as well, so the second photo shows a coat of Essie Matte About You over the design.
Drogon is a black dragon with blood red horns; his egg had swirls of scarlet on the black scales. I started out here with a base of A England Dorian Grey and sponged OPI German-icure over it. I used just a regular black polish to stamp the scale pattern over the base. I definitely prefer this one shiny, but I like the appearance of texture that the matte look has.
Rhaegal is the third and last dragon; his coloring is green and bronze. I started off with Zoya Hunter as my base here and sponged Zoya Edyta. I originally stamped the dragon scales with China Glaze Jolly Holly, but you could barely see them, so I stamped again with China Glaze Argo and I'm happier with the result. I think I like these better matte.
Please tell me that I'm not the only one who is going through Game of Thrones withdrawal!? I finished all the books so far and we are all caught up on the series so I guess my only options are to rewatch and reread until April (??) when the show comes back. But let's talk in the meantime... Who is your favorite character? Any word on when the next book will be out?
Saturday, October 11, 2014
Long Time No See: An Explanation of Sorts and Some Autumn Nail Art to Make Amends
Well, this is awkward. Hello again, everyone! The first thing I want to do is apologize for my ridiculously long, unexplained absence. I wish I had some exciting story like I've been traveling the world and just didn't have time for blogging, but frankly, there is no good reason. Stuff just got in the way. First it was work stuff, then it was wedding stuff, then it was "oh but I really want to finish these 8,348 other crafts I have started instead" stuff and eventually, it became five months since I even posted on my own blog.
People have been asking me why I haven't been blogging and if I was quitting The Nail Network. It made me feel guilty and I always promised myself, "I'll start writing up a blog post when I get home" but I never did. I just wasn't into it for a little while there and things like this aren't worth forcing yourself to do unless you are truly enjoying it and having fun.
But today I woke up and actually felt like writing. I got out of bed and went right to the couch to start typing this out on my laptop. I haven't even eaten breakfast yet (and if you know me, you know how grouchy I get without breakfast first thing in the morning). So please accept my apology for being gone for so long without explanation. I have a lot of catching up to do (my nail room is literally overwhelming), but I'm going to work on it and hopefully get back on track with a normal schedule around here. I have a lot of reviews to do, a little bit of fall nail art to share, a wedding post to write up, and of course I need to start brainstorming for my recurring holiday nail art series!
As a little token of my appreciation for sticking around while I was gone, here is some stunningly simple nail art that you could wear all autumn long! I started with a base of OPI My Vampire's Buff and then carefully painted Essie Very Structured in a chevron pattern over the base. I finished it off with a chevron of Milani Chocolate Sprinkles. If you aren't confident if your free-handing abilities, you can use tape to create the shapes, just make sure that you let the base colors dry for a while before you try to stick the tape on.
Phew! I'm glad to have that all off my chest and out in the open. Hopefully I'll see you guys again really soon! :)
People have been asking me why I haven't been blogging and if I was quitting The Nail Network. It made me feel guilty and I always promised myself, "I'll start writing up a blog post when I get home" but I never did. I just wasn't into it for a little while there and things like this aren't worth forcing yourself to do unless you are truly enjoying it and having fun.
But today I woke up and actually felt like writing. I got out of bed and went right to the couch to start typing this out on my laptop. I haven't even eaten breakfast yet (and if you know me, you know how grouchy I get without breakfast first thing in the morning). So please accept my apology for being gone for so long without explanation. I have a lot of catching up to do (my nail room is literally overwhelming), but I'm going to work on it and hopefully get back on track with a normal schedule around here. I have a lot of reviews to do, a little bit of fall nail art to share, a wedding post to write up, and of course I need to start brainstorming for my recurring holiday nail art series!
As a little token of my appreciation for sticking around while I was gone, here is some stunningly simple nail art that you could wear all autumn long! I started with a base of OPI My Vampire's Buff and then carefully painted Essie Very Structured in a chevron pattern over the base. I finished it off with a chevron of Milani Chocolate Sprinkles. If you aren't confident if your free-handing abilities, you can use tape to create the shapes, just make sure that you let the base colors dry for a while before you try to stick the tape on.
Phew! I'm glad to have that all off my chest and out in the open. Hopefully I'll see you guys again really soon! :)
Wednesday, April 9, 2014
Springtime Floral Gradient Stamping Nail Art
Good morning everyone! I finally had the desire to do some nail art recently and once I sat down to do it, I actually had a really hard time deciding on what exactly to do. It sure helps to have the book around to thumb through for inspiration! I decided on a neutral base with pink/purple gradient stamping and a floral pattern.
The base I chose is OPI My Vampire is Buff, one of my most favorite neutrals. I used Zoya Reagan, OPI Antibleak, and OPI Miss You-niverse to create a stamping gradient by painting a line of each shade and dragging the scraper across the stamping plate in the same direction as I painted the lines. I'm usually not into flowers and floral patterns but I really love this! How do you feel about florals? Fun or granny-style?
Wednesday, December 25, 2013
TDOCNAS: Day 12: Festive Stamped Scroll Design - MERRY CHRISTMAS!
Merry Christmas to everyone who will be celebrating today! And to everyone who doesn't celebrate Christmas, I hope you have a great day! The last design for my Twelve Days of Christmas series began with a sponged gradient of red, green, and gold. Specifically, I used China Glaze Cranberry Splash, Jolly Holly, and Zoya Ziv. I went over it once or twice to make sure it was saturated and vibrant and then I stamped the scroll design from Gals plate GA33 (I think!) in white over top.
I want to end this post with two separate inquiries. First, tell me what you thought about this series! Did it inspire you to do some nail art of your own? What would you like to see for next year's Twelve Days of Christmas series?
Secondly, I want to know what your favorite Christmas tradition is! Where do you spend the holidays? Do you rush around to a bunch of different family member's houses or do you get to relax a little at one place? What do you eat? Do you do a secret santa or do you buy gifts for everyone?
I'll be visiting my parents and my fiancé's parents this morning and then heading to my grandparent's for the rest of the day (and for an awesome ravioli dinner!). Joe and I opened our presents last year on Christmas Eve after he proposed to me, so we did that again last night! Anyway, have a fantastic day everyone!! :-*
I want to end this post with two separate inquiries. First, tell me what you thought about this series! Did it inspire you to do some nail art of your own? What would you like to see for next year's Twelve Days of Christmas series?
Secondly, I want to know what your favorite Christmas tradition is! Where do you spend the holidays? Do you rush around to a bunch of different family member's houses or do you get to relax a little at one place? What do you eat? Do you do a secret santa or do you buy gifts for everyone?
I'll be visiting my parents and my fiancé's parents this morning and then heading to my grandparent's for the rest of the day (and for an awesome ravioli dinner!). Joe and I opened our presents last year on Christmas Eve after he proposed to me, so we did that again last night! Anyway, have a fantastic day everyone!! :-*
Monday, December 16, 2013
TDOCNAS: Day 8: Santa's Belt Nail Art
Good morning everyone! Today's nail art was inspired by Santa's belt. I started with a base of two coats of China Glaze With Love. I carefully painted a horizontal stripe of black across each nail and then used Milani Signature Gold to paint the buckle.
I can't believe that we're already on Day 8! Christmas is only 9 days away! Have you finished all your holiday shopping? How about wrapping?
Labels:
holiday,
nail art,
red,
Twelve Days of Christmas series
Wednesday, December 4, 2013
TDOCNAS: Day 3: Simple Snowman Nail Art
Good morning everyone! Today I have some seriously simple nail art for you inspired by snowmen! To create this look, start with a plain white base. Then, use a liquid eyeliner pen to create the hat, eyes, and mouth of the snowmen on each nail. Finally, take a small nail art brush and an orange polish and paint the noses on each nail. See, I told you it was easy!
I'll see you on Friday with some more nail art! :D
Wednesday, July 3, 2013
Happy 4th of July Nail Art
After finishing up the 500 nail art designs for the book, I can't believe that I still had the desire to do my nails for the 4th of July, but I did! Things should be getting back to normal around here very soon and I hope you're as happy as I am about that!
So anyway, I was originally planning on doing a totally different design on each nail, but decided that I wanted them to be a bit more unified. I decided on stars and stripes for the ring and middle nails and a glitter gradient for the pinky and index nails. The white is Milani White on the Spot, red is Zoya Sooki (which photographed more orange than it looks in real life), and blue is China Glaze First Mate. The glitter for the gradient is Shimmer Nichole.
For my thumbs, I decided to do a red, white, and blue gradient with Shimmer Alice on top. The white got overwhelmed by the red and blue, but I still think it turned out pretty good.
I'll be spending my 4th of July with my family on my grandparents' property, enjoying delicious food, sun bathing, and watching our own personal fireworks show! Do you have any exciting plans for the day?
So anyway, I was originally planning on doing a totally different design on each nail, but decided that I wanted them to be a bit more unified. I decided on stars and stripes for the ring and middle nails and a glitter gradient for the pinky and index nails. The white is Milani White on the Spot, red is Zoya Sooki (which photographed more orange than it looks in real life), and blue is China Glaze First Mate. The glitter for the gradient is Shimmer Nichole.
For my thumbs, I decided to do a red, white, and blue gradient with Shimmer Alice on top. The white got overwhelmed by the red and blue, but I still think it turned out pretty good.
Labels:
blue,
China Glaze,
glitter,
gradient,
Milani,
nail art,
red,
Shimmer polish,
stamping,
white,
Zoya
Friday, June 28, 2013
Disney Princess Nail Art Series: Jasmine
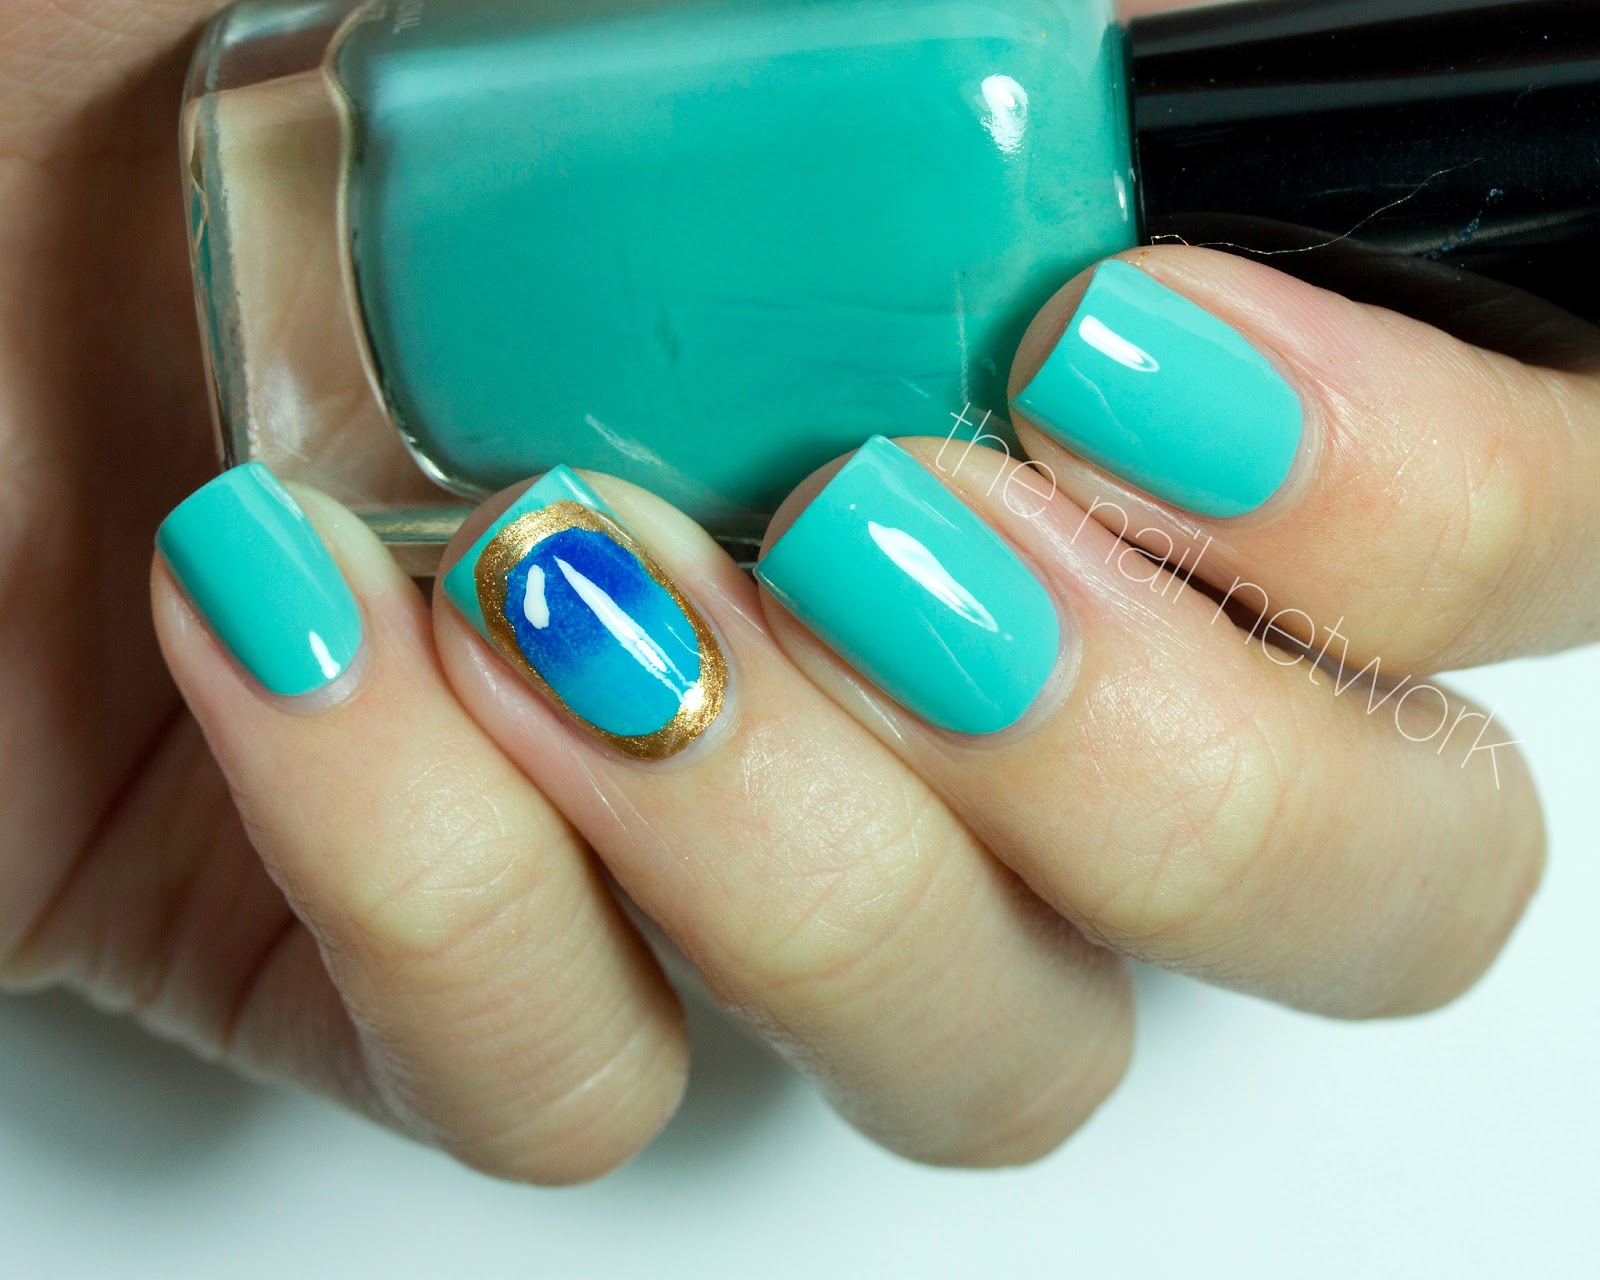
A lot of you guys were really excited about my Disney Princess nail art series so I finally have another princess for you! This design is based off of Jasmine's head band (from Aladdin, for those of you poor unfortunate souls who have never seen it).
I used Zoya Wednesday for the base color. On the ring finger, I sponged China Glaze First Mate and I think OPI Can't Find My Czechbook to create the jewel. I painted a bit of white on the top to make it look like it was reflecting light and then surrounded the whole jewel with a dark gold.
So what do you think of it? I know it's a little simpler than some of my other nail art, but I really like how it turned out! Did you get what it was meant to be right away?
I used Zoya Wednesday for the base color. On the ring finger, I sponged China Glaze First Mate and I think OPI Can't Find My Czechbook to create the jewel. I painted a bit of white on the top to make it look like it was reflecting light and then surrounded the whole jewel with a dark gold.
So what do you think of it? I know it's a little simpler than some of my other nail art, but I really like how it turned out! Did you get what it was meant to be right away?
Monday, April 1, 2013
Fandom Series: 'Bad Wolf' Doctor Who Nail Art
Good morning! I hope everyone had a lovely weekend! I have a second design in my Fandom Series to share with you today and it is Doctor Who themed! Very fitting since I believe a new episode aired over the weekend. It sucks not having BBC America!
Also, happy birthday to the greatest fiancé in the world! Love you! :*
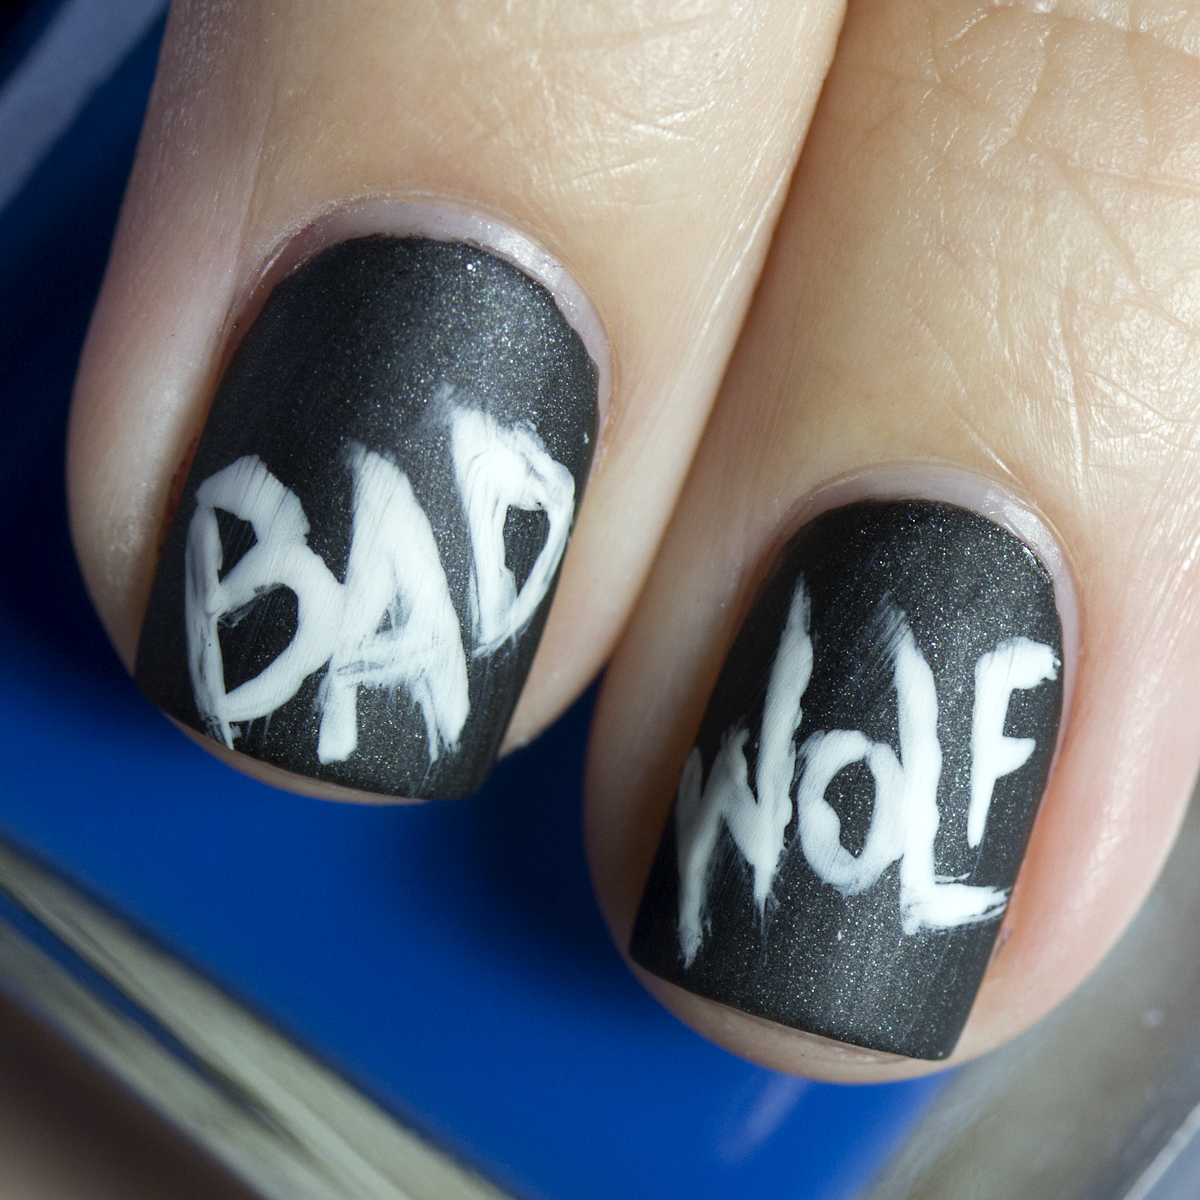
In honor of one of my favorite companion, Rose, I chose to do Bad Wolf nails instead of the typical TARDIS-inspired art. I started out with two coats of ManGlaze Matte is Murder and then hand painted the words using a plain white polish.
Do you watch Doctor Who? Who was your favorite companion?
Also, happy birthday to the greatest fiancé in the world! Love you! :*
In honor of one of my favorite companion, Rose, I chose to do Bad Wolf nails instead of the typical TARDIS-inspired art. I started out with two coats of ManGlaze Matte is Murder and then hand painted the words using a plain white polish.
Do you watch Doctor Who? Who was your favorite companion?
Labels:
black,
Doctor Who,
Fandom Series,
matte,
nail art,
white
Thursday, March 14, 2013
Fandom Series: Harry Potter 'Battle of Hogwarts' Nail Art
Hey guys! So I have three designs that I dubbed part of a "Fandom Series" that have been hanging out in my draft folder for quite a while because I wasn't too sure about them. I went back through and checked them out again and decided that I'm ready to share! This series is going to be open ended (like my WDW and Disney Princess ones). This first mani is inspired by my all-time favorite book and movie series, Harry Potter (and by Emerald Sparkled's design).
I started out with two coats of black polish and sponged white over where I wanted the colors to go. Then I sponged and painted some red, green, and light yellow acrylic paint over the white to get the look of the colors colliding. If you haven't seen the last HP movie, this design is in reference to the scene of the final battle between Harry and Voldemort.
I'm really excited to bring you the rest of the designs that I have drafted! I hope you all enjoy geekiness as much as I do! ;)
I started out with two coats of black polish and sponged white over where I wanted the colors to go. Then I sponged and painted some red, green, and light yellow acrylic paint over the white to get the look of the colors colliding. If you haven't seen the last HP movie, this design is in reference to the scene of the final battle between Harry and Voldemort.
I'm really excited to bring you the rest of the designs that I have drafted! I hope you all enjoy geekiness as much as I do! ;)
Labels:
black,
Fandom Series,
green,
Harry Potter,
nail art,
red,
sponging
Tuesday, February 12, 2013
Nail Candy Nail Art Pen Swatch/Review
Good morning all! I've got a review of some neat nail art pens for you guys today. These polishes from Nail Candy have a regular brush applicator and and a pen tip as well. I received the "Love Letter" set to test out and I have to say that they are really cool!
Here's a photo of the pen tip applicator. I think the polishes work best when you use the pen; the brushes are pretty wide and mop-like. I really like how the pen gives you a puffy paint look.
These dual-ended pens are sold on www.nailcandypen.com and retail for $10/each.
Here's a photo of the pen tip applicator. I think the polishes work best when you use the pen; the brushes are pretty wide and mop-like. I really like how the pen gives you a puffy paint look.
These dual-ended pens are sold on www.nailcandypen.com and retail for $10/each.
Products provided for review
Subscribe to:
Posts (Atom)