Friday, September 28, 2012

Milani Fall Fashion Nail Trends Photos/Swatches

Hey everyone, happy Friday! Today I wanted to share my entries to the Milani Fall Fashion Nail Trends Pinterest boards and I hope you enjoy them. The first design I did was called Haute Rod and I used Milani Rapid Cherry as my base coat. Then I drew a thick stripe down the center of each nail with Black Swift and finished it off with Silver Dazzle half moons. This was my favorite look!


The next look was called Colorblock. I used Milani White on the Spot for the base here and then taped off sections of the nail and used Fresh Teal and Black Swift for the actual colorblocking. I finished the design off with some dots in Totally 80's.


This design was for Gilded Rebel and is my second favorite of the ones I did. Here I used Black Swift as my base and did french tips using Gold Glitz. Lastly, I took a toothpick and picked up the individual glitters from Gold and used them to accent the tips.


This is the fourth and last design, called Glamazon. With a name like that, I knew that I had to do something bold and glittery, so this is what I came up with. I used Black Swift as my base (which by the way is an awesome and quick-drying black!) and sponged Twinkle, Fuchsia, and Teal from the cuticles in that order. This was was really fun and sparkly!


Do you think I got the trends right? Which design is your favorite? You can check out the rest of the Fall Fashion Nail Trend boards by heading over to Milani's Pinterest page.

*Products in this post were provided for my use to create these designs.*
Wednesday, September 26, 2012

Naild'It Candy Corn Swatch/Review

It's officially fall, everyone! To celebrate, I wore this gorgeous polish from Naild'It called Candy Corn. It's a gorgeous mixture of autumn-appropriate shades that look absolutely stunning over Milani Chocolate Sprinkles (can you tell how much I like this polish??). I'm so in love with Naild'It polishes; every single one that I've tried has been incredible and so unique!

Monday, September 24, 2012

A England Gothic Beauties Collection Swatches/Review

Gooooood morning everyone and happy Monday! I'm so excited for this post that I can barely stand it! I got the A England Gothic Beauties from Llarowe to swatch for her online store and I decided to review them for you all as well. There are five shades in this collection and they are all dark, vampy, and gorgeous! I've also included macro shots of each shade after the initial swatch. Enjoy!

Jane Eyre is a stunning blackened red base with rust-colored shimmer. The shimmer is definitely not as evident is low light situations as it is in the sun or bright indoor light, but it is still there.


Lady of Shalott has the same blackened base as Jane Eyre, but it's filled with gorgeous royal blue shimmer. It appears in the macro shot to also have a bit of pink and purple shimmer to it as well. Sooooo pretty!


Dorian Gray reminds me of a brushed pewter mug that my dad bought as a souvenir the last time we went to Walt Disney World. It's base is the perfect shade of grey and it has some subtle pink and green shimmer as well.


Ophelia is a deep, dark blackened plum with royal purple shimmer throughout. I think this is definitely the darkest of the group and the hardest to capture as well. Side note: I kept giggling every time I saw the name on this one because the first thing I thought of was Ophelia crabs from Deadliest Catch! ;P


Tess D'Urberville is, hands down, my favorite from this collection. It's dark, shimmery, elegant, and edgy all at once! If you love a good green polish, you won't want to pass on this blackened green with emerald shimmer.


The formula on all of these shades was very good; I needed two coats for full opacity and had no problems controlling the polish on the brush. A England polishes retail for $12 on Llarowe and somewhere around $12 directly from A England (depending on the exchange rate at the time) but you have to wait longer for them here in the US since it's an international order! What do you think of the A England brand? Will you be buying any polishes in the Gothic Beauties collection?

*Products in this post were provided for my honest review.*

Friday, September 21, 2012

Kawaii Nail Lacquer Harry Potter Collection Swatches

Happy Friday everyone! Today I have some awesome Harry Potter nail polishes to show you from Kawaii Nail Lacquer! The first one is Hufflepuff, a mix of yellow and black glitters in a clear base. I layered two coats of Hufflepuff over China Glaze Lighthouse.


Ravenclaw is my favorite of the bunch, a mix of navy blue and copper glitter; I layered it over Zoya Natty. I think my bottle leaked a little in transit, and that's why there's an imprint of bubble wrap on it. :P


Slytherin is a mix of emerald green and silver glitter and while it's a perfect match for Slytherin house, it also would be fabulous for St. Patty's Day! I layered Slytherin over Zoya Ray.


And lastly is Gryffindor, a fiery mixture of red and gold glitter. I have it here over Zoya Elisa.


These polishes were a little different from typical glitters in that I had to use a "dabbing" method instead of regular brush strokes. The dabbing works really well though and I was able to get great coverage in two coats. Kawaii has a bunch of awesome glitter polishes in her shop, including Halloween and Avengers-themed polish. You can visit the Etsy shop and like Kawaii on Facebook!

*Products in this post were provided for my honest review.*

Wednesday, September 19, 2012

Dollish Polish Expecto Patronum & Cult Nails Manipulative Review & Swatch

I've seen this combo done on a couple of different blogs so far and had been dying to do it myself, but just never seemed to get around to it. Well, I finally did and am so mad that it took me so long! These polishes are absolutely perfect together.

Cult Nails Manipulative is on my middle and ring nails and it's a gorgeous minty blue/green shimmer that was absolutely perfect in two coats. This is going to be a great color when springtime rolls back around.

Dollish Polish Expecto Patronum is a white-based polish with glitter that is pretty much the same shade as Manipulative. I did three coats here just to make sure that it was opaque enough for my taste.


So what do you think about this combo? Have you tried it before or are you planning to in the future? I'd love to see your swatches if you've tried it already! 

Monday, September 17, 2012

Girly Bits Banana Hammock, Glo Worm, Mother May I?, & Hocus Pocus Review & Swatches

Good morning everyone! I have some more beautiful swatches for you today, this time from the brilliant hands of Pam from Girly Bits! The first color I have to show you is called Banana Hammock (lol!) and it is a great shade of yellow with shimmer. I used three coats here and the formula was awesome.


This is Glo Worm and check out that shimmer! This is one amazingly gorgeous neon lime green polish. Three coats used here as well with a great formula.


Mother May I? is a delicate mixture of blue, pink, purple, and red glitter in a light purple semi-sheer base. I would definitely consider wearing this one over a more opaque base color as I still had slight VNL after three coats. This is such a pretty glitter combo!


Hocus Pocus is something that I think a lot of you will go nuts over, a sheer silver holographic topcoat! I layered one coat of it over Essie Go Overboard to show you how versatile it is; not only will it look great over light colors, but your dark fall shades can be holo-fied too!


Here's another angle... I'm loving this combination!


Girly Bits polishes can be purchased directly from Pam via her online store or from other sellers, such as Llarowe, as well. They retail between $10-$12.50 depending on what polish you are looking at and where you buy. Do you own any Girly Bits? Are you going to purchase any of these?

*Products in this post were provided for my honest review.*

Friday, September 14, 2012

KBShimmer Fall Collection Review & Swatches

Happpppy Friday! I'm so excited to finally be sharing these swatches with you guys. Christy at KBShimmer was kind enough to send me her Fall Collection to swatch and true to form, they are amazing!

I Made a Bleu Bleu is a gorgeous blue shimmer, almost foil-like actually. It has slight green, purple, and gold shimmer if you look at it at the right angle. I used three coats.


Witch Way is like the night sky in a bottle... It consists of tons of holo glitter suspended in a deep purple jelly base to mimic stars in the sky. This was a bit sheer; I used three coats but think that I would like this better layered over an opaque purple.


Don't Teal Anyone is an amazing teal polish with purple, blue, and gold hex glitter and small fuchsia bar glitter. I sound like a broken record whenever I talk about KBShimmer polishes, but they are seriously so stunning! This is two coats of Don't Teal Anyone.


Oh Splat! would probably be my favorite if I was able to choose one. I used three coats to make sure there was no nail line visible. Don't hesitate to buy this if you love white-based glitters!


Toucan Touch This... is this not the most unique polish ever or what? Toucan Touch This has the coolest base of yellowy lime green and is filled with blue, orange, and yellow glitter, as well as micro shimmer and tiny bar glitter. Tropical party in a bottle! 


No Whine Left is a perfect fall color. It has blue, purple, and fuchsia glitter in a deep wine-colored base. Great coverage in two coats and a fantastic formula.


Quantum Leaf is another great fall shade, kind of a dirty yellow base with red, orange, and yellow glitter meant to mimic the changing colors of fall leaves. I liked this one a lot more than I thought I would; it's really unique and interesting!


Jack is a fantastic Halloween color, consisting of orange glitter in a black jelly base. Three coats here but I'd probably layer this over a black creme when I wear it again.


These shades can be ordered through the KBShimmer website and seem to be in stock now. Which ones are you loving? Do you plan on picking any up?

*Products in this post were provided for my honest review.*

Wednesday, September 12, 2012

Birchbox Review: August

Hey everybody! I have a little (late) review of my August Birchbox with pictures of all the products for you today. In case you are unaware of what Birchbox is, it's a monthly subscription program that costs $10/month and gets you a box of beauty samples delivered right to your door each month.


This month's box was back-to-school themed and came with a little "lesson" pamphlet with beauty tips in it. Definitely a cute addition.


The first two samples I got were a Viva La Juicy perfume sample and Stainiac gel stain from the Balm. I don't really wear perfume so I wasn't into that, but the stain is pretty neat! You can use it on your cheeks as a blush or on your lips.


The next two samples were Yu-Be Moisturizing Skin Cream and Eye Rock stick on eyeliner. The cream is nice but I've been using a Bare Minerals cream and I like that better. The eye liner tape looks really neat and I'm excited to try them but haven't had the chance yet. I will follow up when I do!


This last item was an extra in my box, a Schick Hydro Silk razor. This was, hands down, my favorite item. The razor is fabulous and it came with a coupon for extra heads! I will definitely be purchasing refills for this.


So there you have it, my first Birchbox! If you are interested in signing up for a monthly Birchbox subscription, you can do so here (this is a referral link). Do you have a subscription already? What do you think of it?

Monday, September 10, 2012

Monthly Favorites: August!

I totalllllly forgot that I wanted to do a monthly favorites post, but better late than never, right? So here's a quick post about my favorite things during August.

Nail Polish:
I did these awesome leopard print nails for my boyfriend's sister's baby shower that was jungle-themed at the end of August and they totally sparked a new love of animal print. I didn't get a chance to take a good photo of them with my camera, but I have a quick Instagram shot below. I'll hopefully be re-doing them at some point so I can post about them! I also included my swatch of Darling Diva Polish's 13th Colony from her Battlestar Galactica collection because I'm so in love with it.


Hair:
I finally figured out how to do a real, true sock bun! I only got it to work really well once, but I'll take it! I'm sure it will get easier as my hair gets longer as well. I can't wait until I can do these all the time; I love the way they look!


I also got my bangs back this month! I was having issues with them and needed to grow them out a bit, but I was finally able to have them trimmed back into proper side bangs. I was unnaturally excited about this! :P


Random:
Three words: sweet potato roll. I've been obsessed with these ever since I first tried sushi during last winter and man, I really could eat one every day. SO DELICIOUS.


So those were my favorite things for the month of August! I'm hoping September's favorites post will be better and longer :) What did you love in August?

Friday, September 7, 2012

Guest Post: The Do It Yourself Lady Shares a Riveting Funky French Mani

Hello gorgeous peoples over here on The Nail Network. I'm Lizzy, also known as The Do It Yourself Lady. Chelsea and I are members of a group on Facebook and when the opportunity to write this blog post came up, I was totally "fan-girl-ing" and jumped on the offer. The Nail Network is one of the blogs I run to when I'm looking for color accurate swatches, and I enjoy the straight-forward writing always done by Chelsea. 

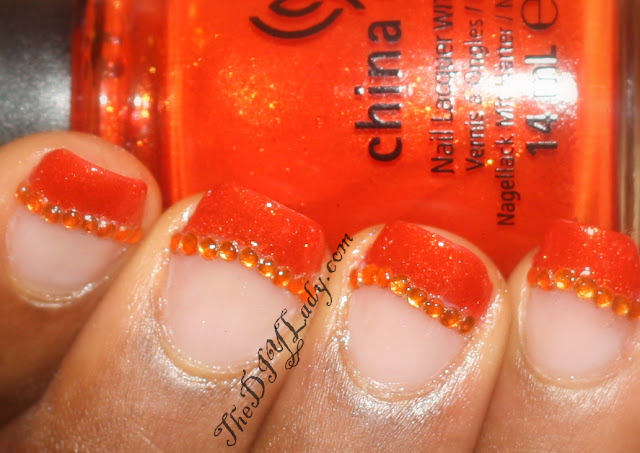
The moment I committed to writing this blog post, I knew I would use one of my un-used polishes that I'd been longing to use but never a chance to use. It's China Glaze - Riveting. 

Figuring out the polish to use was the easiest thing, but deciding exactly what to do with the polish was another task. Lol... At the end of the day, I chose to do a 'non-traditional' french tip. I say Non-traditional because it's not a "white tip". 


 I began this mani by using Kleancolor - Calcium as my base coat. Then I used one coat of OPI - Care to Danse. I then made the tips with China Glaze - Riveting, without nail guides, because I knew the lines wouldn't show since I planned to apply rhinestones. If I wasn't going to use rhinestones, I would have used tape or a french tip guide to create a clean line for my french tip.


After I placed the rhinestones on my nails, I used two thick coats of my favorite topcoat. Color Club Topcoat - The ones that come with the sets that are sold at ROSS. They are super fast drying and glossy! :-)


Well, that's it for now darlings. 

I'm glad to have been able to share this mani with you all today. I really enjoy doing colored french tips, and rhinestones always add something extra to a mani.:-)

Once again, Thanks for having me on your blog Chelsea. I hope unpacking and house cleaning is going well for ya. 

Lizzy, thank you so much for the post and the kind words! I would like to send out internet hugs to all five of my guest bloggers this week. Thank you all for helping me out and sharing yourselves with my readers! Readers, I sincerely hope you enjoyed this week and get ready for regular posting again on Monday! :)

Thursday, September 6, 2012

Guest Post: College Polished Gets Fierce With a Skittle Mani!

Hey everyone, please welcome Kim from College Polished as our guest poster today! I hope you guys are enjoying these posts as much as I am! Kim has a fierce mani to share with us today :)
Hi dolls! I’m so honored to be guest posting for Chelsea seeing how obsessed with her blog I am! Today I’ve got a pretty, yet simple mani with a little bit of free-hand nail art inspired from an interesting source. Let’s jump right in!
For this mani, I used Nina Ultra Pro Black for the cheetah spots, Essie Cascade Cool, Black Cat Lacquer ­Let Them Have Cake, China Glaze For Audrey and Sinful Colors Unicorn. 
The inspiration from this manicure actually came from a new bathing suit I just picked up from Victoria’s Secret. I saw it and immediately went “Oooooh, this would look great as a mani.” That being said, I had to jump on it ASAP!
I used two coats each of Cascade Cool, Unicorn and For Audrey and three coats of Let Them Have Cake. There’s still a slight VNL which could easily be covered by using a base coat or maybe a few more coats, but personally I love how it looks!
Cheetah print is probably one of my most favorite types of nail art for two reasons – 1) it’s insanely easy and 2) I’m obsessed with all things cheetah. No. Really.­ All you have to do is use a dotting tool or even toothpicks to make small dots in each color you want. Next, you can use either a smaller dotting tool or another toothpick and draw little curves around the outside out the dots to look like cheetah spots! Aaaaand you’re done. Quick, easy, and beautiful! Now if getting ready in the morning could only be that easy ;)
That’s all from me today, huge thanks again to Chelsea for letting me guest blog for her! Please feel free to check out my blog (collegepolished.com) and Facebook page (facebook.com/collegepolished) as well!