Thursday, September 10, 2015

JORD Wood Watch Review

As a nail blogger, this review is a little out of the box for me, but bear with me because you will totally want to check this out! When JORD got in touch with me about reviewing one of their watches, I wasn't sure at first because it didn't relate to nails, but I took a look at their website and fell in love! I knew you guys would love their watches too, so I emphatically said yes.


JORD timepieces are made from sustainable woods and are absolutely stunning. Mine is the Fieldcrest model and is made out of zebrawood with a maple face. All watches ship (for free worldwide!) in a beautiful wooden box atop a JORD branded pillow, nestled safely inside a padded box. The glass is scratchproof, which is awesome, and while you shouldn't submerge your wooden watch, it will survive if it gets splashed by accident.


My favorite aspect of my wood watch is how well it matches my wardrobe. I tend to gravitate towards simple pieces in neutral tones, so my watch is the perfect complement to all of my outfits. It's also a great talking point; I've gotten so many complements on it in the week or so since I received it! And while these watches could definitely be considered luxurious, they are reasonably priced too. The Fieldcrest watch retails at $120 and the other models range in price up to $295, which I think is really reasonable considering the quality of these watches.


If you are interested in a unique wooden timepiece from JORD, please check out their website! I already have my eye on the Cora model in Purpleheart to add to my Christmas list. ;) Don't forget that they ship for free worldwide and each watch comes with a one year warranty!
 

The products in this post were provided for my honest review. All opinions are my own.


Wednesday, August 26, 2015

My Top Five Favorite Fall Polishes

I know we're still a few weeks out from it being "technically" autumn, but lately I've been so in the mood for fall colors that I decided to put this post together. These are my top five absolute favorite polishes to wear during the fall. I do have a lot of other shades that I enjoy wearing around this time, but I find myself reaching for these five very frequently every year.

OPI Every Month is Oktoberfest is a super dark, super shimmery blackened shade of garnet. The formula on my bottle is incredible and covers great in two coats.


Essie Very Structured is kind of my "wild card"; I never expected to like this dark pumpkin spice shade, but I actually love it! I'm wearing two coats.


A England Dorian Grey is an absolutely stunning gunmetal grey metallic. Two easy coats are all you need.


Zoya Monica is a stunning aubergine crème. I have such a thing for purples and I wear this all the time, fall or not. The formula is fantastic and it covers perfectly in two coats.


A England Tess D'Urberville is one of my all time favorite shades. This deep, dark shimmery green is absolutely breathtaking! I'm wearing two coats.


What's your favorite fall polish? Did it make my list?

Saturday, August 22, 2015

OPI Hawaii: Swatches/Review of My Favorites

Are you hanging onto the shred of summer like I am? Wearing your tropical maxi dresses one last time? Soaking up the warmth before the temperature starts dropping and the leaves start turning? I can't say I'm not excited for that (I love fall!), but I'm not quite ready to give summer up just yet. So today I have my favorites shades from the OPI Hawaii collection to share the summer spirit with you.

Do You Take Lei Away? is a lovely milky beige cream shade. I love wearing shades like this every other week or so in the summer to kind of cleanse my palette from all the bright shades I wear. This is two coats.


That's Hula-rious! is an awesome light minty green polish which covered well for me in two coats.


Go With the Lava Flow is a gorgeous shade of pink that reminds me of hibiscus flowers. What made this one a favorite is the stunning blue shimmer in it! I just love shades like this. I'm wearing two coats and the formula was perfect. 


Aloha from OPI is a searing hot shade of coral that leans far to the red side, but with just enough pink to make me love it. Wear this to the beach if you want to stand out! Two coats here.


Is Mai Tai Crooked? is a light mango orange polish. I find that most orange polishes give me a Halloween vibe, but this one does a good job of staying in summer territory. The formula wasn't the best here, but I got away with two coats.


Hello Hawaii Ya? is a beautiful dusty shade of lilac that was excellent in two coats. You know my favorites list had to include a purple! :P


OPI released this collection in the spring, but you should still be able to find it now (possibly even on clearance!). Which shade was your favorite?

Friday, April 24, 2015

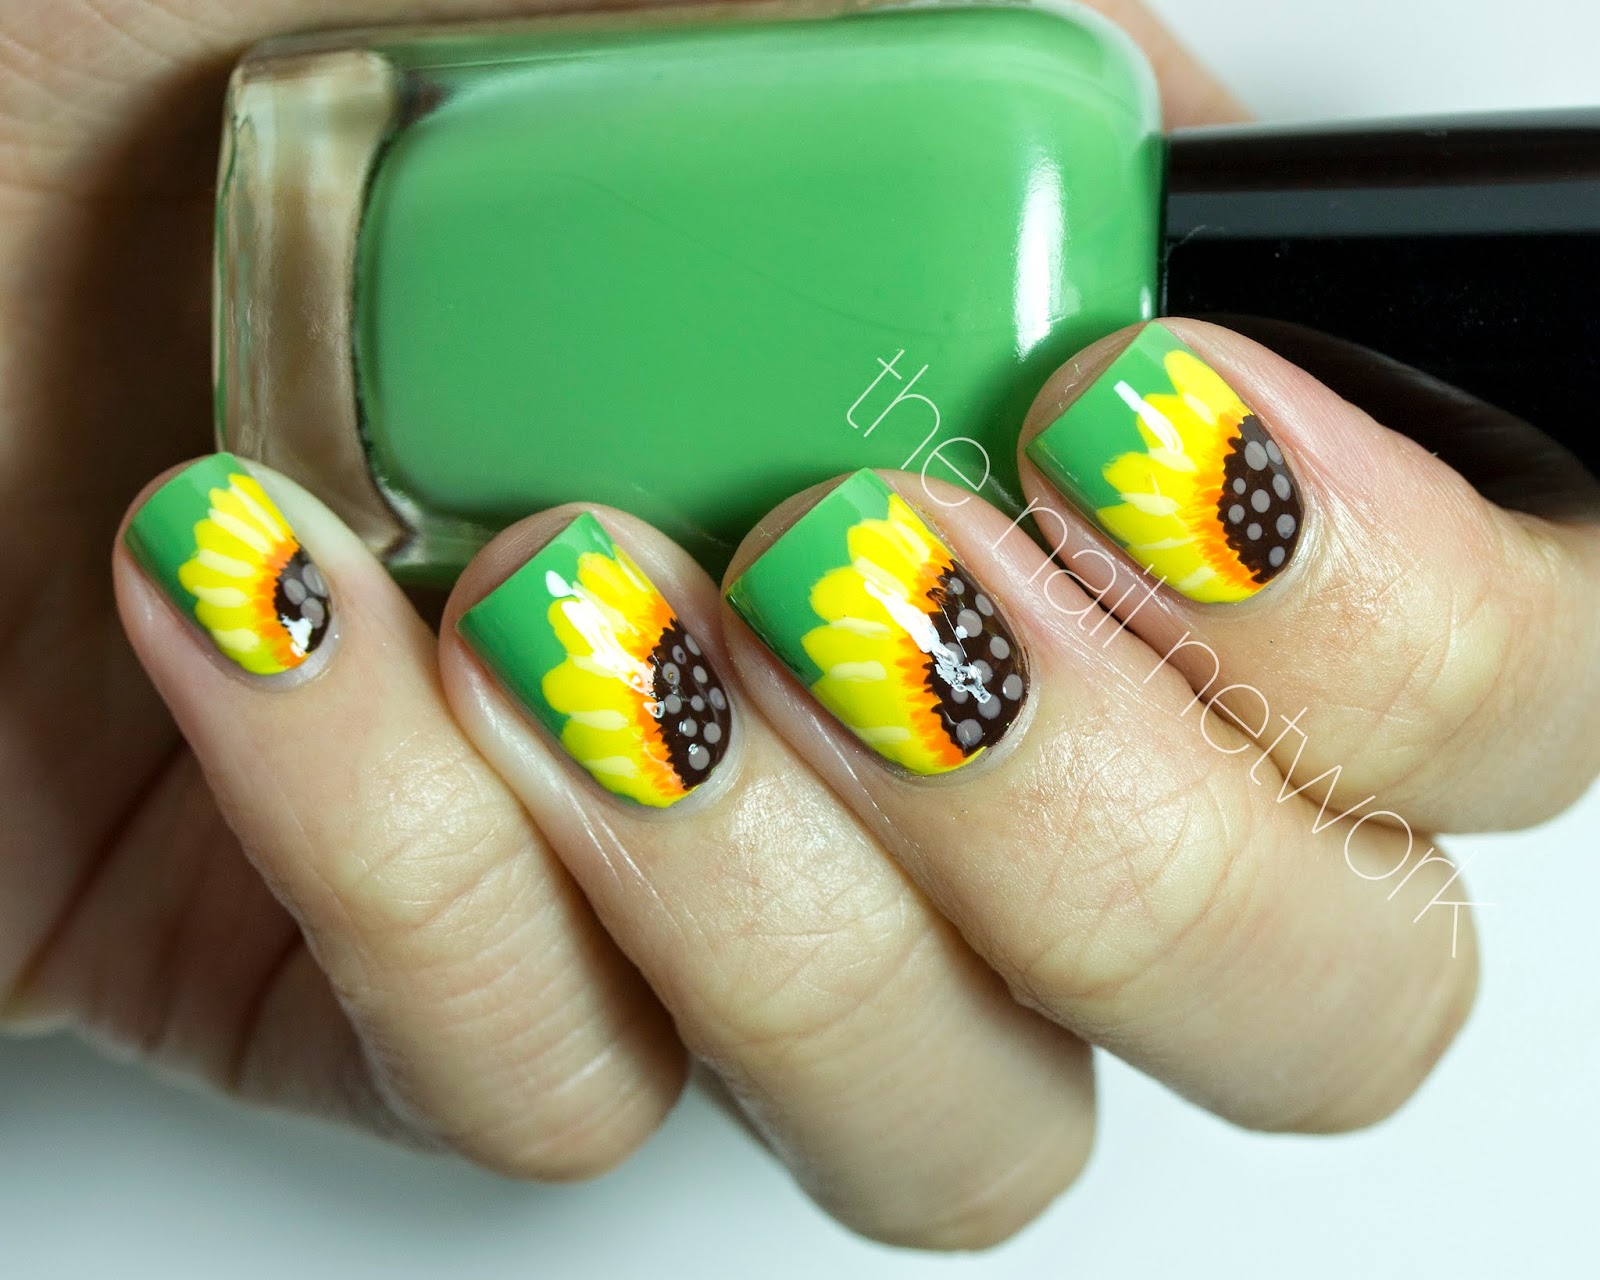
Spring Sunflower Nail Art

Hi guys!! I missed you all! I know it's been ages since I've posted and usually bloggers apologize for that when they've been absent, but I'm not going to this time. :P I've just been living life and pursuing other passions and I don't think there is a need to apologize for that. I started The Nail Network at a fun project, not as a job, so why should I force myself to post if I'm not feeling it 100%? I'd rather step away for a bit and come back once I've taken a breather and renewed my interest. With that said, I'm not promising I'll be back to posting consistently. I don't know when I'll post. I'm just going to paint my nails at my own pace and post when I feel like it.

But anyway, that's enough introspection and life-talk, I pulled these sunflower nails from my archives because I'm desperately craving the warm spring weather that we are supposed to be having in April! It's been snowing here the past two days! It's not sticking but still, it's the principle of the thing.


For this look, I started out with two coats of the most perfect green grass polish, Zoya Tilda. I used a nail art brush to paint the big yellow sunflower shape with a Sally Hansen Insta-Dry polish (the name is escaping me but I know it has the word "lightning" in it) and then I mixed a little bit of white with it to paint the lines for the petals. I used an orange shade (I don't remember this one either, don't kill me!!) to create a jagged line near the center of the flower and then I used Zoya Louise to make the darker brown area, making a jagged line over the orange. I finished the design off with some taupe dots inside the darker brown area. And top coat of course!


I have the whole weekend off, so hopefully there will be some nail painting and post writing in my near future! ;) Hugs!!

Tuesday, January 20, 2015

KBShimmer Men Are From Mars-ala Swatch & Review

In case you are living under a rock (or are like me and just don't care), Pantone released their Color of the Year for 2015 and it's... marsala. Marsala is apparently a reddish brownish wine shade that I definitely am more into than the orchid shade they picked for 2014. KBShimmer created a wonderful representation of the Color of the Year with their new shade Men Are From Mars-ala.


Men Are From Mars-ala is a gorgeous red-brown holographic polish. As always, the formula was perfect and I got excellent coverage in two coats. KBShimmer never disappoints! This shade is available now, so check out KBShimmer's website!

The products in this post were provided for my honest review. All opinions are my own.

Monday, December 29, 2014

Neutral Snowflake Nail Art with Zoya Kennedy

I told you I was going to have some nail art with these snowflake stamping plates coming up! I wore this design for a long time and absolutely loved it. I like to mix in up in the winter and wear neutrals to balance out all the dark shades I wear and Zoya Kennedy is my all time favorite neutral.


I started with two easy coats of Kennedy and used China Glaze I'd Melt for You and Konad Special White polish to stamp snowflakes from Born Pretty plates QA57 and QA58. I did large snowflakes on my thumb and ring nails and topped them off with a silver rhinestone. Definitely give this look a try if you're looking for a work-appropriate winter mani!

Thursday, December 25, 2014

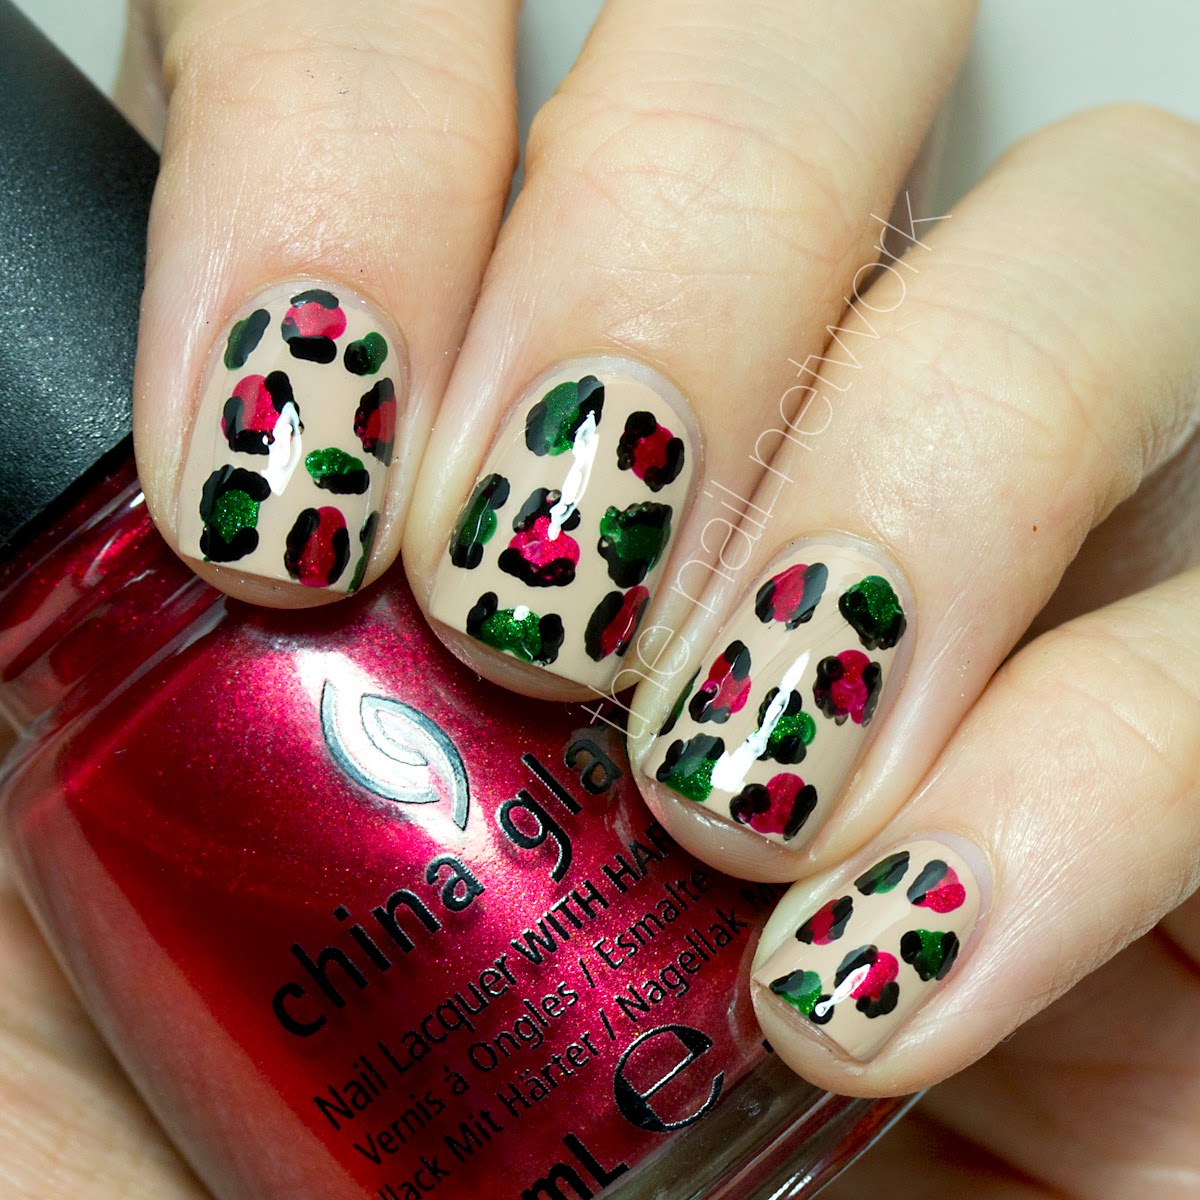
TDOCNAS 2014: Day 12: Wishing You a Wild Christmas with Leopard Print Nail Art!

Yeah, I went there! I love hand drawn leopard print, so I figured why not give it a festive touch?? You know you love it! By the way, Merry Christmas everyone! Let's get to the nails, shall we?


I started out with a base of Zoya Taylor instead of my go-to OPI My Vampire Is Buff because I wanted a slightly deeper tan. I used China Glaze Jolly Holly and Cranberry Splash (shocker!!) to dot the random leopard spots on each nail and then outlined them with plain black polish. I'm so in love with this look! I haven't done leopard print in ages and it's just so cute with the red and green.


I hope you all have a wonderful, safe, and wild Christmas! :-*

Wednesday, December 24, 2014

TDOCNAS 2014: Day 11: Glittery Reindeer Nail Art

Happy Christmas Eve everyone! I hope you have all of your affairs in order and are all having a wonderful day. I'm working until 1 o'clock and then heading over to our annual family Christmas Eve party later tonight and I can't wait! This is my absolute favorite time of the year. Anyway, these nails were inspired by my obsession with glittery reindeer this season. I know it's weird, but I can't help it! I'm hoping to pick up a couple on sale after Christmas. ;)


I used Zoya Godiva on my pointer and ring nails and plain black on my pinky and middle nails. I wish Godiva had photographed the way it looks in real life; it's so sparkly but it doesn't translate at all in the photos! I used Godiva to paint my little reindeer as well and finished him off with a China Glaze Just BeClaws nose. I also did some Just BeClaws dots on the rest of my nails to tie the look together.


See you tomorrow for the last day of the Twelve Days of Christmas nail art series!!

Tuesday, December 23, 2014

China Glaze Twinkle Collection Swatches & Review

Good morning! I have an absolutely lovely winter collection to share with you today, the Twinkle collection from China Glaze. Winter collections are often hit or miss for me and I'm glad to report that this one is a hit!

I'd Melt for You is a beautiful silver chrome. Be careful with brush strokes on this one, but two coats covers well if you're careful. This is also great for stamping!


Tip Your Hat is a bright festive red. I'm wearing two coats.


Chillin' With My Snow-mies has different sizes of white hexagon glitter in a clear base. Too much base, not enough glitter. I love how this looks but I had to pretty much dig out each of these glitters and place it on the nails. I'm wearing it over Tip Your Hat.


A December to Remember is a turquoise-leaning blue metallic with pink micro glitter. This is two coats.


Define Good... is a rich red shimmer with a hint of pink. I know I normally hate reds, but I do love this type. It just glows! This is two coats.


Dancing & Prancing is a beautiful confetti glitter. I'm wearing one coat over Define Good... and I love this combination.


Out Like a Light is a muted deep teal. I absolutely love this shade! This is two coats and the formula was great.


De-Light is a golden glitter topper with silver bar glitter. This is two coat over Out Like a Light.


Feeling Twinkly is an icy blue glitter topper. I'm wearing two coats with no base; this would probably cover pretty well in three or four coats.


Meet Me Under the Stars is so stunning! This is a super dark blackish blue with tons of glitter. I'm wearing two coats.


Pine-ing for Glitter is a glitter topper in a unique green shade. This is two coats over no base.


No Peeking! is a silvery purple almost metallic shade. I had a little bit of an issue with brush strokes here, so be careful. This is two coats.


There's a lot of winners in this group, but I have to say my favorites are Meet Me Under the Stars and Define Good... How about you? Are any of these shades on your wish list? You can get yourself this collection anywhere that China Glaze is sold.

The products in this post were provided for my honest review. All opinions are my own.

Monday, December 22, 2014

TDOCNAS 2014: Day 10: Winter Berries Nail Art

It's the week of Christmas! Yay!! Today I have some simple nail art inspired by the bright red berries that grow around here in the winter. They are such a vivid pop of color against a bland winter landscape and I thought they would be perfect for nail art.


I started with two coats of China Glaze Don't Honk Your Thorn for my base and used Zoya Louise to paint the branches across each nail. I dotted the berries on using China Glaze With Love and topped it all off with top coat! Easy!

Friday, December 19, 2014

TDOCNAS 2014: Day 9: Festive Negative Space Nail Art

I've seen this "negative space" nail art popping up a lot recently and thought I would give it a try with a holiday twist. I wasn't sure how I felt about them before I tried one, but it turns out that I really love them! I might even wind up wearing this as my actual Christmas manicure.


To create this design, I applied one coat of KBShimmer Basic Training base coat and let it dry completely. Once that was done, I used KBShimmer straight nail vinyls to block off the parts where I wanted my natural nail to show through and painted Zoya Ziv near the cuticles, China Glaze Jolly Holly in the center, and China Glaze Cranberry Splash near the tips (can you tell that those are my absolute favorite holiday polish shades?).

Wednesday, December 17, 2014

TDOCNAS 2014: Day 8: Silver Sideways Snowflake French

Good morning! We're going a little less festive and a little more wintery for today's nail design. I love the snowflake stamping plate that I got from Born Pretty Store so much that I've been using it all the time! You'll definitely be seeing more nail art with it after the Twelve Days of Christmas series is over.


I started out with two coats of OPI Don't Burst My Bubble (my favorite sheer pink ever). I used hole reinforcers to block off part of my nail and painted China Glaze I'd Melt for You to create the sideways french shape. I stamped the snowflakes using Born Pretty plates QA57 and QA58 and Konad special white stamping and finished the look off with silver rhinestones in the center of each snowflake.


I can't believe in a week it will be Christmas Eve! I can't wait!

Monday, December 15, 2014

TDOCNAS 2014: Day 7: Festive Dotted Nail Art

Good morning and happy Monday everyone! Today's design is a super easy but seriously pretty dotted manicure. I love this one because they remind me of festive ornaments!


I started with a base of OPI My Vampire Is Buff (my favorite neutral, in case you didn't notice!). I used China Glaze Cranberry Splash, Jolly Holly, and Zoya Ziv to create the dots. I did the large size first and then filled in the space with the smaller dots.


Make sure you tag me if you recreate these! I love seeing your work!

Friday, December 12, 2014

TDOCNAS 2014: Day 6: Christmas Star Nail Art

You guys know I love obnoxiously festive Christmas nail art, but I also really love low-key designs too! This star design is one of my favorites because it's so pretty and holiday-esque, but totally wearable for every day.


I used two coats of Zoya Jacqueline as my base and then used Zoya Ziv to paint the star shapes on each nail. I also used Ziv to create some dots to fill in the spaces on the nails too. I finished the look with a couple of rhinestones and top coat!

Are all your presents bought? I'm waiting on a couple more things but have every thing else wrapped so far! :)

Wednesday, December 10, 2014

TDOCNAS 2014: Day 5: Snowy Forest Nail Art

Good morning! I'm so happy with these nails and I'm dying to share them with you! Last week, I came across a repost of Nails By Jema's wintery forest nails on Instagram and I knew I had to try to recreate them.


I started with two coats of Rescue Beauty Lounge Bella for my base and then "watermarbled" with KBShimmer White Here, White Now (this technique was borrowed from MadamLuck). You just let a little drop of polish fall into the water and spread and stick your nail in and it creates a lovely snowy look! Once that was done, I used Zoya Evvie and SquareHue Na Prikope to create the pine trees and some plain white polish for the snow on the trees.


They're so pretty and wintery without being obnoxiously festive. But you could add some garland and ornaments to the trees if you were feeling obnoxiously festive! What do you think?

Tuesday, December 9, 2014

The Nail Network Decks the Halls: A Look at My DIY Christmas Decorations

Most of you know that Christmas is my absolute favorite holiday and that I get really into decorating for it (sometimes in the middle of November...). Last year, I got really crafty and made a couple fun decorations for my house and this year, I continued the streak. I love crafting and it's so nice to save a few bucks by making something yourself instead of buying it in a store. Plus, you get to brag that you made it when people ask you about it! ;) Today I'm going to give you a quick little tour of my Christmas decorations and give a couple short little tutorials about a few of my favorite crafts.

Nail Polish Ornaments
Of course you've already seen the nail polish ornaments that I made last year! The tutorial on that is here if you missed it. These are so simple and inexpensive but turn out stunning. I've been putting polishes aside throughout the year that I think will look great as ornaments and I can't wait to start making some again now that I've dug my leftover clear ornaments out of storage!


Mason Jar Snow Globes
I also made a whole bunch of these adorable mason jar snow globes last year. I have three or four of them in my house, plus I made a bunch for gifts too and they were a hit! You need spray paint, candlesticks, mason jars with lids, snow-like glitter, E-6000 craft glue, and little trees. I bought a package of the trees from Amazon for a pretty good price. To get started, glue the lid of the jar to the candlestick using the E-6000 glue (if you use hot glue on glass candlesticks, it'll just peel off). Let it dry for a few minutes and then take it outside and spray paint the whole thing white (or any other color you want). Once the spray paint is completely dry, you can bring the bases in and glue the trees to the inside of the lid. To finish it up, fill the mason jar with glitter (I went about 1/4 full for mine), screw the lid on to the jar, and then flip it over to see the finished product!


Ornament Wreath 
This ornament wreath is a new addition to our house for this Christmas season. I've seen these in stores but they are always so expensive, so I've been hunting in thrift stores and dollar stores for cheap ornaments to make my own. You need a ton of ornaments and a wreath base to make this, plus hot glue to hold it together obviously. Take all the tops off of the ornaments and glue them around the inside and outside of the wreath base with the open top all facing up. Then, flip the base around and start filling in the spaces! This works best if you have a bunch of different sized ornaments to fill in all the little holes and leave as little of the base showing as possible.


Salt Dough Ornaments
I also attempted to make salt dough because I wanted to make dog paw ornaments for my pups and I wound up having a lot of fun experimenting with different things to make the ornaments. I made the paw print ones and one with the print of the key from our house, but my favorites were like the one pictured below. To make them, I rolled the dough out, pressed a piece of a pine branch into it and then used the cookie cutter to cut out the tree shape. I also tried some with rubber stamps that turned out really great! The salt dough is super to easy to make too; all you need is one cup of salt, one cup of water, and two cups of flour. The recipe makes a lot of dough, so I ended up using the ornaments as gift tags for all my gifts too!

 Did you DIY anything fun for the holidays this year?